Issue #17, Just enjoy the ride
Let's Get Lost, July 13, 2024
On June 24, 2013, Steve got his first motorcycle. I wanted nothing to do with it. It was his thing and I had no intention of ever getting on the back for any reason.
A few weeks after he got it, I suggested that we spend our upcoming Sunday hiking.
He said, “We could take the bike.”
I started to say, “absolutely not”, and then, for some reason a thought appeared inside my brain: What kind of a person do you want to be? The kind who says no to new experiences or the kind who is open enough to just try?
So, instead of saying no, I said, “Give me a moment to wrap my head around that” and we sat in silence for a bit.
Finally, I said ok.
That first ride is something I’ll never forget. It felt dangerous and daring and so bad ass. I clung to him like I was in constant danger of falling off until I realized that’s not how it works, and relaxed a bit. Just a bit.
He took us up to the top of a place called Lookout Mountain, on steep roads with hairpin curves and even though I was filled with anxiety, I also learned that we weren’t going to fall over at every turn.
At the end of the day I had to admit that I enjoyed it. But I still wasn’t sure how often I’d want to go out.
Then, the next morning, I watched Steve get on the motorcycle to go to work and as he left I realized that I felt envious. I wanted to be on the back of that bike.
And that was it.
After that day, if we were going anywhere, I wanted to take the bike. We rode everywhere and in every condition - wind, rain, blazing heat, and freezing cold. It didn’t matter. If we could take the bike, we did.
Mostly, when we were out for a ride, I wanted to just keep going. The two of us, whatever we could fit in the saddle bags, and miles of open road felt like freedom and I gulped it down and wanted more.
Over the years, we covered the entire country on that bike. Before we moved into the RV, we rode it through every single state except Hawaii (we rented a bike in Hawaii) and including Alaska.
A couple of weeks ago, I read this in a post by Josie George:
“The trouble is, as soon as you close your heart to one thing — to anything — you close your heart. It doesn’t work in increments. As soon as I begin to say no and pull away, there is a contraction, and that contraction closes me off. So I have to ask the question: do I want be open, or closed??
At the time I read that I thought that I did not know the answer to her question. Because there are many terrible things in this world and I would very much like to shut them out.
But, in the last few weeks, Steve and I have spent days on the bike, riding through Montana, parts of Wyoming and South Dakota, up to Calgary, and all over western North Dakota. I would not have those experiences, let alone the thousands and thousands of miles that came before them, if I had not decided to be open enough to get on that bike.
Besides seeing parts of the country we would not have seen otherwise, time spent on the back of the bike gives my mind time to wander.
“For the mind to draw inspiration, it wants space to welcome the new.” - The Creative Act
The word inspiration comes from the Latin word inspirare - which means to breathe in or blow into.
I am a passenger on that motorcycle. The hours spent there require very little of me. There is nothing to do except release control and enjoy the ride.
This situation creates a lot of open space in my mind. Some of my best ideas and most inspired insights have appeared in all that open space.
Inspiration is a force not immune to the laws of entropy. We must give it space to exist and we must open ourselves enough to to tune in.
So, I guess I know the answer to Josie’s question after all.
What about you? Are there circumstances that allow your mind to relax and open enough for inspiration to blow in? What are they and how do you create time for them? Leave your thoughts in the comments below. ❤️
Here’s what you’ll find in the rest of this week’s issue:
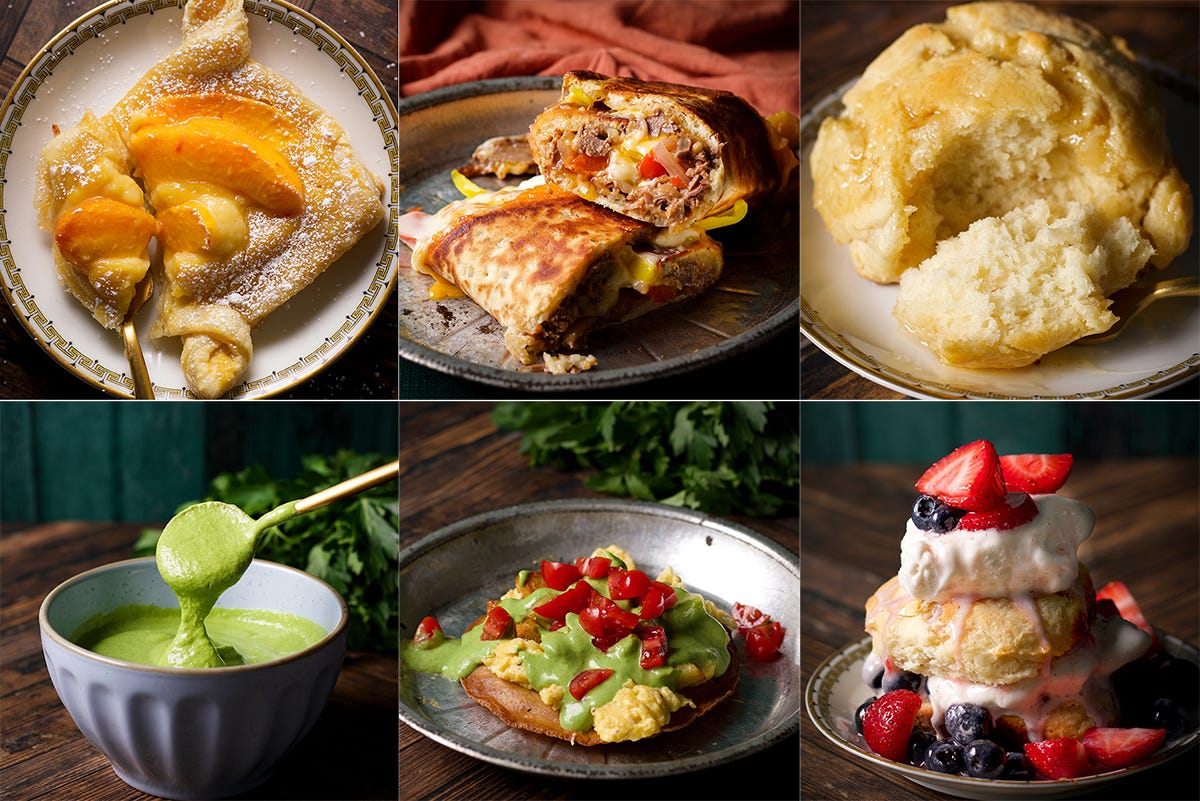
Chocolate spice cake and 5 other recipes to add to next week’s meal plan
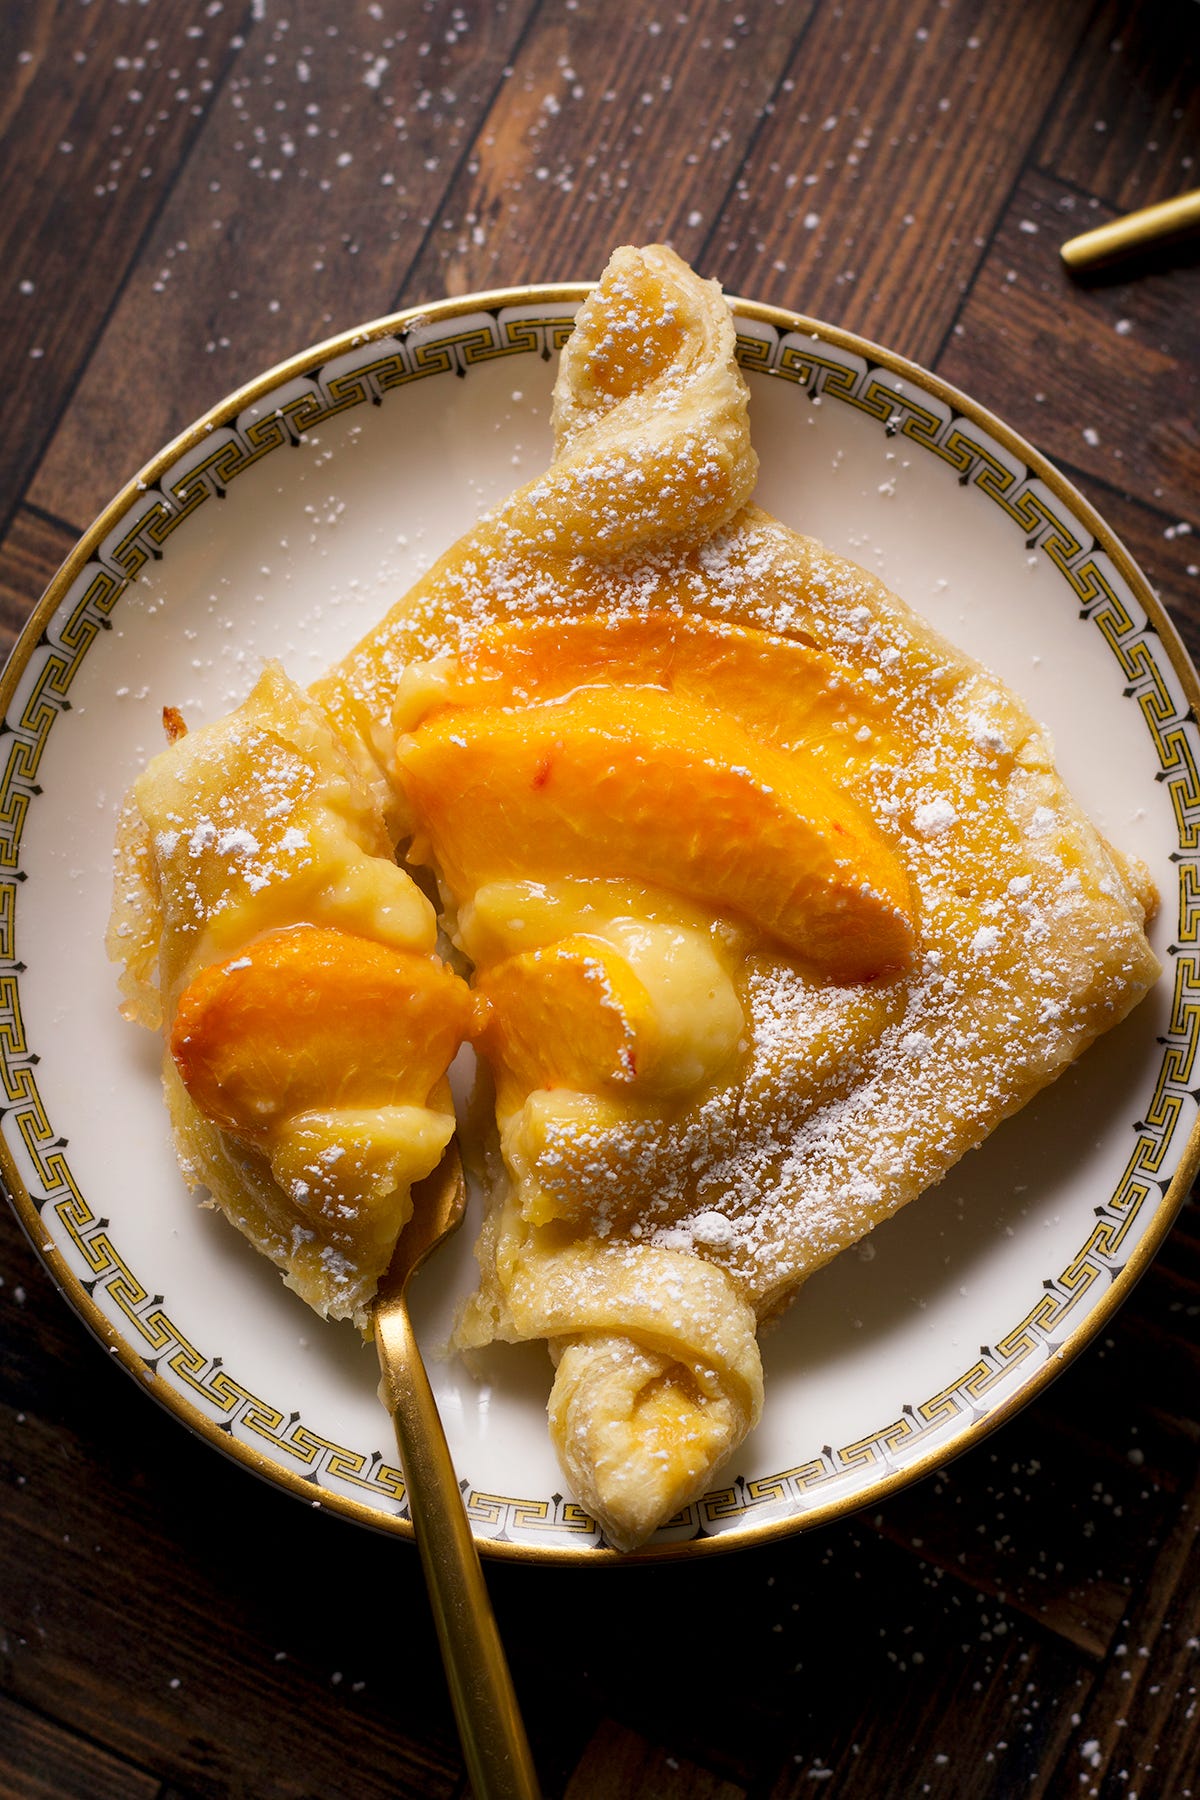
Decadent peaches and cream puff pastry danishes
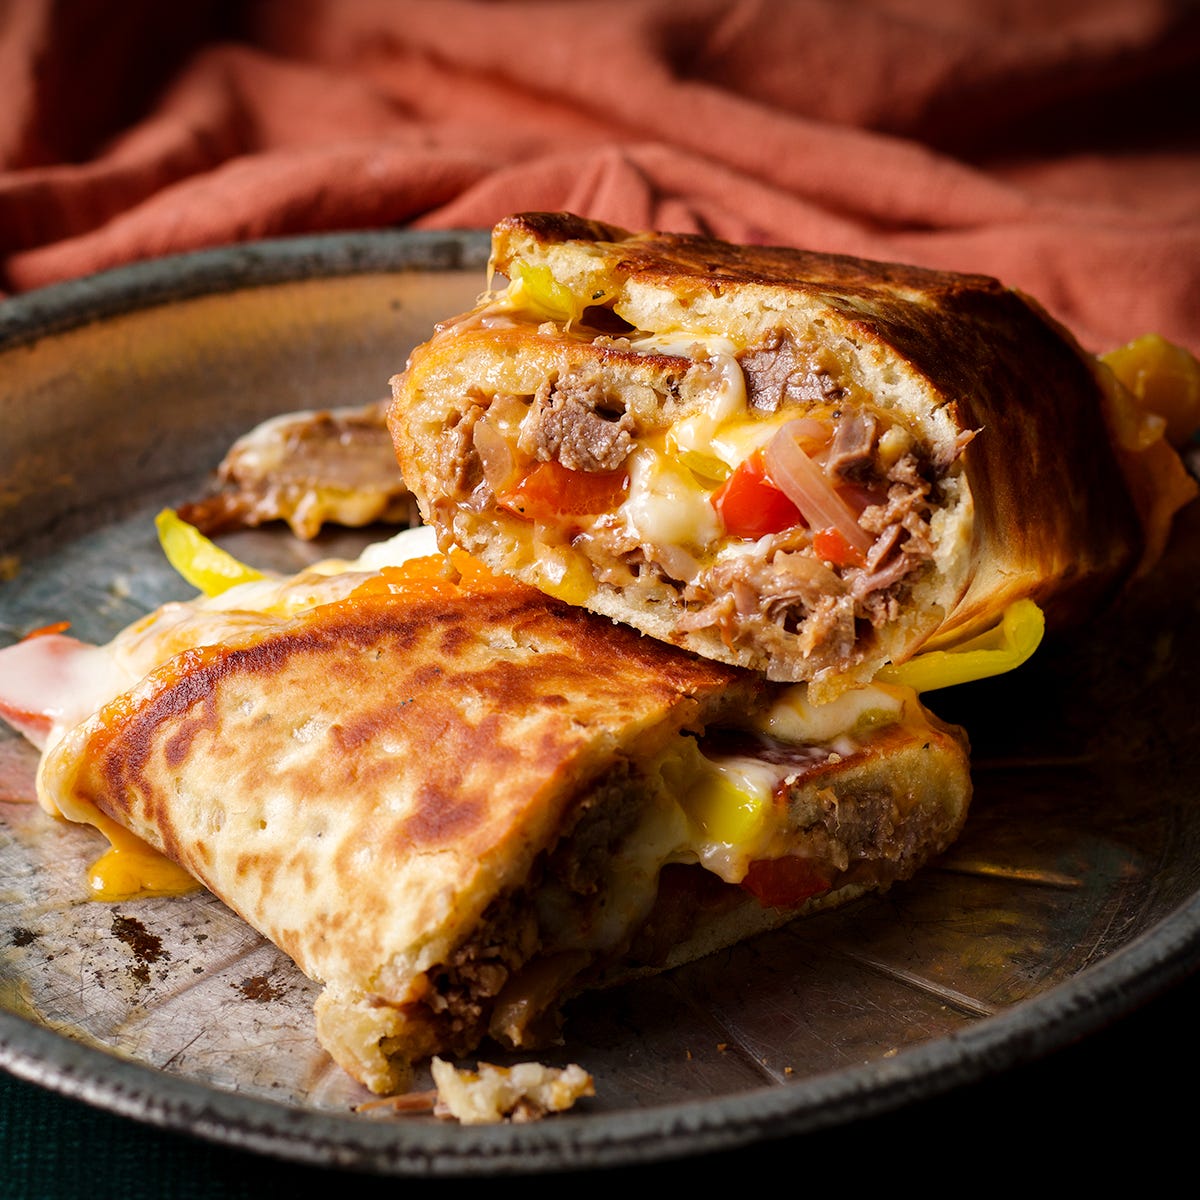
A melted-cheesy-steak-stuffed wrap that was inspired by a pizza restaurant in Red Lodge, Montana
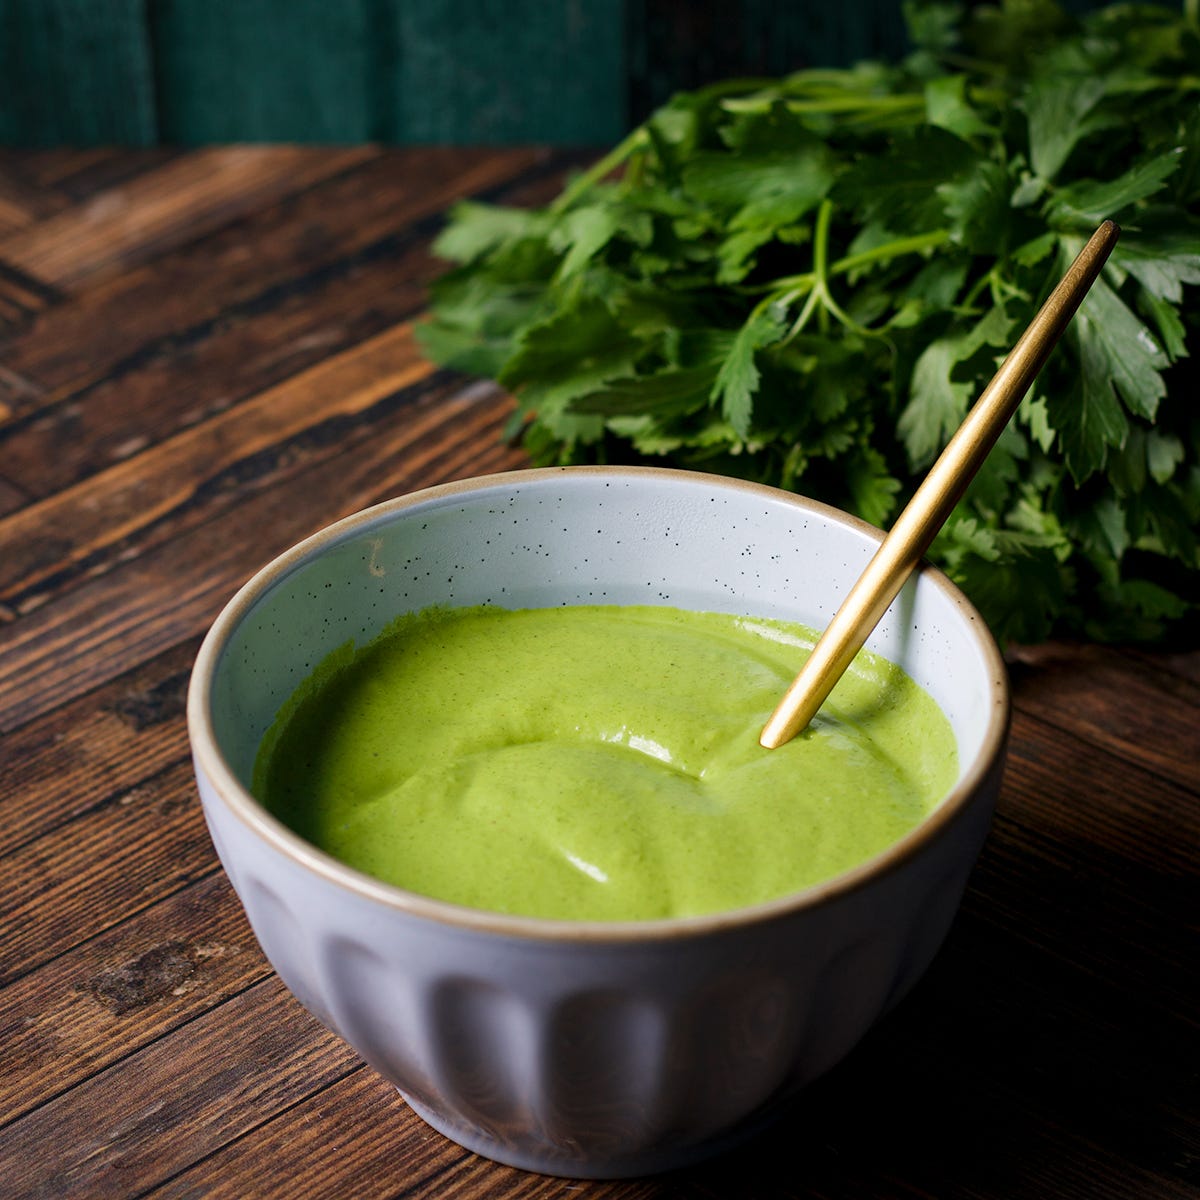
A spicy Peruvian green sauce that you’ll want to spoon over everything
Impossibly light Angel biscuits
Strawberry shortcake with vanilla ice cream
Plus….
In case you missed it in last week’s issue, would you take a couple of minutes to provide some feedback about this newsletter? It’s 100% anonymous and none of the questions are mandatory - answer as many or as few as you like.
It is very important to me that this newsletter include the kind of content you find valuable and relevant. So, thank you, thank you in advance for any feedback you are willing to offer. ❤️
New recipe on the blog: Chocolate Spice Cake
This is a ridiculously easy cake to make, with a gorgeous chocolate flavor packed with warm spices and the fudgy texture we all want in a chocolate cake. Use this recipe to bake an 8-inch two-layer round cake, a 9x13-inch sheet cake, or 24 cupcakes.
Get the recipe: Chocolate Spice Cake Three Ways
What to make this week: 5 recipes for your meal plan



General Tso's Cauliflower with Sriracha Rice: Golden, fried cauliflower that's light and extra crispy tossed in 3-step homemade sweet, sour, and spicy General Tso's Sauce. Serve the whole saucy mess over a bowl of Sriracha Rice just because you can.
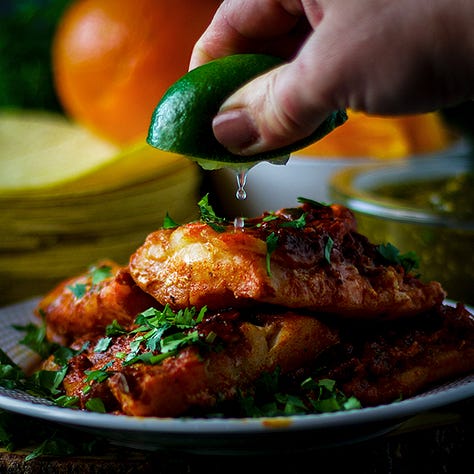
Adobo Fish Tacos with Citrus and Crispy Fried Onions: These vibrant, flavorful fish tacos include flaky white fish cooked in a delicious red-chili-based Mexican adobo sauce and topped with citrus fruit, salsa verde, and crispy fried onions. Every bite is a riot of flavors in the best possible way.
Blackstone Fried Rice with Pork or Chicken: Use fresh or leftover white rice and either chicken or pork for this easy, vegetable-packed Blackstone fried rice. Cooking fried rice on a Blackstone Griddle is fast and easy, and creates the perfect texture and flavor. BUT, you can also make this on the stovetop in a skillet or a wok.
Israeli Salad with Pomegranate Vinaigrette and Roasted Nuts: This Middle Eastern salad recipe is low in calories, vegan, dairy-free, and gluten-free, making it the perfect option for dietary restrictions and anyone interested in clean, plant-based meals. But don't let its health benefits fool you. This salad is also bursting with flavor and easy to prepare. So whether you're looking for a quick lunchtime bite or a tasty side dish for dinner tonight, this salad has got you covered.
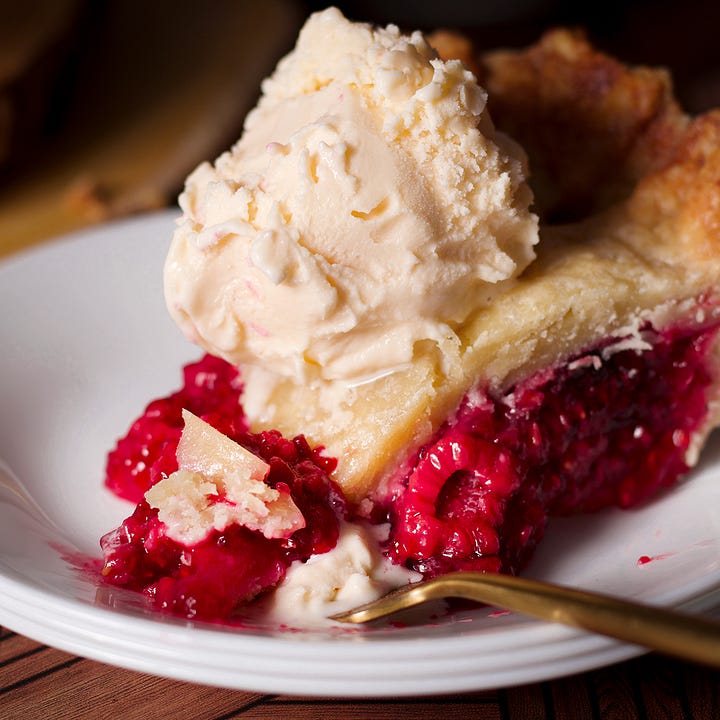
Raspberry Pie: This is my idea of the perfect Raspberry Pie. It’s bursting with the natural sweet-tart flavor of juicy raspberries tucked into a buttery, flaky simple homemade lattice crust. The filling can be made with fresh or frozen raspberries and is the perfect consistency for neat, easy slices.
The Montana Roll
Last month, after an afternoon spent riding Bear Tooth Highway, we stopped for dinner in Red Lodge, Montana. Not being familiar with the town, we chose a restaurant at random, plopped ourselves down at the bar, ordered drinks, and perused the menu.
The restaurant was Natali’s Front Bar which is part of the Red Lodge Pizza Company - the two restaurants are side by side and share a menu. One of the sections on the menu is devoted to Montana Rolls.
Not having any idea what a Montana Roll is, I asked the bartender to explain. He said they were kind of like wraps, but the bread was made from thin rolled pizza dough. I decided to try one, The Fromberg Roll, and it was so delicious that I determined to figure out how to make them at home.
Montana rolls, as the bartender described, are pizza dough wraps that are served hot. So, of course, there is the option to make some pizza dough, roll it out so it’s fairly thin, and bake it.
Or, you can skip all that and use a package of Indian Naan from your local supermarket.
Not only did our homemade Montana rolls come out cheesy and delicious, using packaged Naan makes these warm wraps quick and easy.
Because I was trying to mimic the Montana Roll I ordered at Natali’s Front Bar, I used most of the same ingredients. Here’s the description of the Fromberg Roll, taken straight from the menu: Tender chopped beefsteak, sautéed green peppers & onions, banana peppers with melted American & provolone cheese.
I used Sirloin tip steak that I braised low and slow for a couple of hours until very tender. But, you can use any kind of steak or roast beef that you like in here. They are a delicious way to use up leftovers.
Also, it occurred to me after I made these, that thick sliced deli roast beef would also work well and make these wraps even easier. That’s what I’m going to do next time.
As you can imagine, the sky’s the limit with the variations here. But here are my top two tips regardless of whatever filling ingredients you choose:
Add cheese under the other filling ingredients AND on top of them. The cheese really helps everything stick together. Besides, does two layers of melted cheese actually need any justification?
Don’t overfill these babies. Remember that you’re wrapping everything up into a roll, so you want to be generous with the toppings but not add so much that you can’t roll them up.
Here’s how to make them:
Heat the oven to 425 degrees and line a baking sheet with parchment paper.
Lay a piece of naan on the parchment lined baking sheet and brush it with about a tablespoon of melted butter (I used Roasted Garlic Stonefire Naan, which is pretty easy to find at most supermarkets).
Top the naan with thin slices of cheddar cheese (we like sharp cheddar). Depending on how thick the slices are, you may want to allow space between the slices so there’s room for the melted cheese to spread. You can also use grated cheese.
Place the pan in the oven and let the naan bake until the cheese is melted.
Remove the pan from the oven and top with bite-size pieces of steak or a few slices of thick sliced deli roast beef, a handful of sautéed bell peppers and onions (see instructions below), and sliced banana peppers. Top everything with thin slices of provolone cheese (or grated provolone).
Put the pan back in the oven and bake until the cheese on top is melted and starting to bubble.
Remove the pan from the heat and immediately roll it up. It will be very hot, so this is tricky. For me, the easiest way to accomplish this is to hold one side in place with a pot holder and use a flat spatula to gently fold the other side up and over. Press it down - the melted cheese will hold it in place, then fold it over one more time. Cut it in half with a serrated knife and dig in.
How to make sautéed peppers and onions: Cut an onion in half and remove the outer layers of skin. Slice it, lengthwise, into strips that are about a half of an inch thick. Remove the stem and seeds from a couple of bell peppers, any color, and slice them into strips that are about an inch thick.
Add a tablespoon of oil to a large skillet and set it over high heat. When the oil is hot and shimmering, add the sliced onion and peppers. Cook, stirring frequently, until the onions are beginning to caramelize (they will be starting to turn golden brown) and the peppers have some black spots on them. Remove from the heat - they are now ready to use.
For more filling ideas, check out the “Montana Roll” section of the Red Lodge Pizza Company menu.
One of these days, sooner rather than later, I’m going to try them filled with sliced meatballs and marinara and mozzarella and provolone cheese. I also want to try them filled with these sheet pan Greek meatballs with tzatziki sauce to drizzle over the top.
If you try these, please leave me a comment to let me know what you filled them with!
Peaches and Cream Puff Pastry Danishes
I am writing this on the afternoon of the morning I spent testing this recipe and I am not ashamed to say that Steve and I have polished off 8 of these babies. We had two each for breakfast and then in lieu of something more responsible, like salad for lunch, we chowed down on the remaining 4.
Next time I make these it will be when there are other people around to share them with because clearly we have no self control.
Also, no regrets. These little pastry cream and peach filled pastries are sooooo delicious. Even better, they use prepared frozen puff pastry, so they are relatively easy to make.
The filling for these danishes is my favorite pastry cream recipe made with coconut milk instead of dairy milk.
Using coconut milk gives the cream a very mild coconut flavor. Coconut and peach are a delicious flavor combination but I didn’t want these to have a pronounced coconut flavor - I wanted just enough to play off the flavor of the fresh peaches. Of course, if you’d rather just use whole milk, go right ahead.
Make the pastry cream the day before you want to bake these (or up to 3 days in advance) so it has plenty of time to set up in the refrigerator.
With the pastry cream already made, all you have to do is shape, fill, and bake them. Shaping and filling the pastries will take about 20 minutes and baking them will take about 30 minutes.
This recipe makes 8 danishes.
Ingredients:
3/4 teaspoon (2.3 grams) unflavored gelatin
1 1/2 teaspoons (7.5 grams) cold water
3 large egg yolks
2 tablespoons (15 grams) cornstarch
1 cup (241 grams) coconut milk, full fat, from a can or a carton (or whole milk)
1/4 cup (50 grams) granulated sugar
1/8 teaspoon salt
1 teaspoons (7 grams) pure vanilla extract
1/2 teaspoon almond extract (optional)
One 17.3 ounce package frozen puff pastry with two ready-to-bake sheets; I used a package of Pepperidge Farm Puff Pastry Sheets
1 egg (for the egg wash)
2 medium to large size peaches
Granulated sugar and powdered sugar for sprinkling
Make the pastry cream:
In a small dish, stir the gelatin and water together to combine. There should be just enough water to moisten the gelatin, creating a rubbery paste. Set aside.
Add the egg yolks and cornstarch to a medium size bowl and beat with a wire whisk to combine. Set the bowl on a kitchen towel somewhere close to the stovetop. (This will keep the bowl from sliding around on the counter when you whisk in the hot milk.)
Set a 1 or 2 cup heat proof measuring cup next to the stovetop, preferably one with a pourable spout.
Add the coconut milk, sugar, and salt to a 3-quart or larger heavy bottomed saucepan and stir to combine. Cook over medium heat, stirring frequently, just until it barely begins to boil. Remove the pan from the heat.
Pour the hot coconut milk into the measuring cup. Slowly pour the coconut milk from the measuring cup into the egg yolks, pouring slowly, and whisking constantly. Then, pour everything back into the saucepan and set it over low heat. (You want to continue to heat the eggs slowly so they won’t scramble.)
Cook, stirring constantly, until the custard is thick. As soon as it thickens to the consistency of pudding, remove from the heat and whisk for about 20 seconds longer. Pour the pastry cream into a bowl.
Break the gelatin into small pieces, dropping them onto the hot pastry cream. Let stand for about 20 seconds to let the gelatin to melt, then stir until the gelatin is completely incorporated. Stir in the vanilla and almond extract.
Cover with plastic wrap, pressing the wrap over the surface of the pastry cream. Refrigerate for at least 3 hours and up to 3 days.
How to assemble and bake the pastries:

Allow the frozen puff pastry to defrost at room temperature (keep it covered) for about 45 minutes.
In a small bowl, whisk 1 whole egg with 1 teaspoon of water to make an egg wash and set the bowl near your workspace.
Peel the peaches, remove the pit, and slice them into pieces that are about 1/2-inch thick. Set the sliced peaches near your workspace.
Line a baking sheet with parchment paper and heat the oven to 375 degrees.
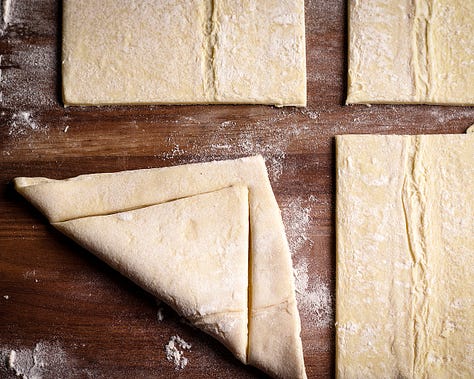
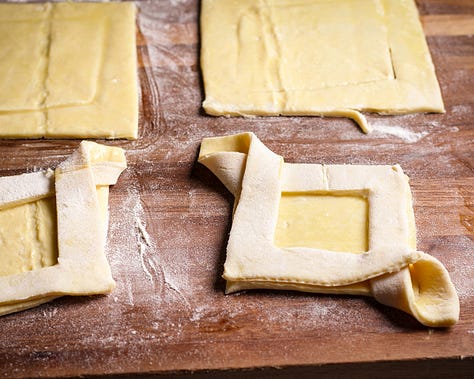
(Photo #1) Lay one sheet of puff pasty on a clean work surface that’s been lightly dusted with flour. Fold the puff pastry sheet in half to find the center, unfold and use a sharp knife or a dough cutter to cut it in half so you have two rectangles. Fold each rectangle in half to find the center, unfold, and cut those in half so you have 4 equal squares.
(Photo #2) Fold the squares in half to form a triangle then, using a sharp knife or a dough cutter, cut the dough along two of the sides so the cuts come close together at the tip of the triangle but do not meet.
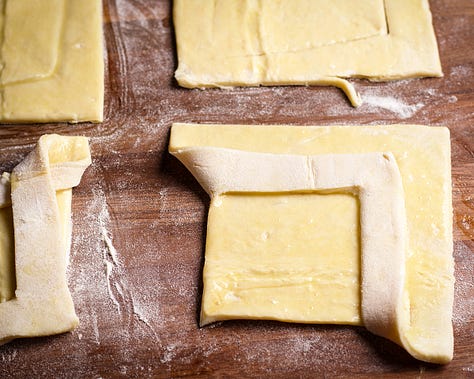
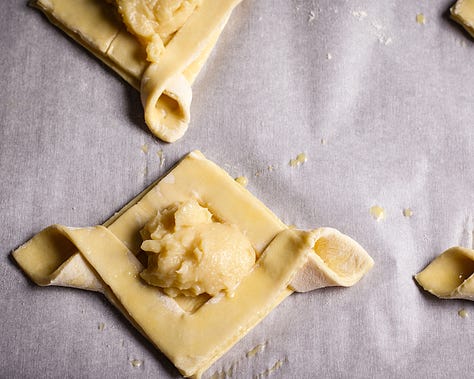
(Photo #3 and 4) Unfold the triangles and brush the tops of the squares with egg wash. Working with one pastry square at a time, fold the outer square over so its edges align with the inner square. Repeat with the other side.
(Photo #5) Use a spatula to transfer the pastries to the parchment lined baking sheet. Brush the outside edges of the pastries with egg wash and add a generous tablespoon or two of pastry cream in the center of each pastry.
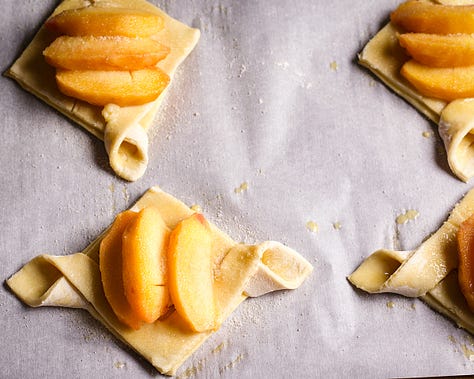
(Photo #6) Layer sliced peaches over the pastry cream and sprinkle each pastry with about a half teaspoon of granulated sugar.
Repeat with the second sheet of puff pastry.
Bake the pastries for 25 - 35 minutes. When done, the bottoms of the pastries will be golden brown and the top of the puff pastry will not appear doughy. Remove from the oven and let rest on the baking sheet for 10 minutes.
If you like, sprinkle the pastries with a bit of powdered sugar before serving. These are just as delicious served warm as they are at room temperature, but are best eaten the day they are baked. If you have any left over, store them in the refrigerator.
If you find that you love this pastry cream as much as I do, you might be interested in the 16 other recipes I’ve used it in. 🙂 You’ll find those recipes listed in the post for the original recipe: Best Pastry Cream
Also, if you need a few other recipes that make good use of summer peaches:
Aji sauce (spicy Peruvian green sauce)
As I type this, I am trying to think of what this gorgeous sauce wouldn’t be delicious on.
Ok. Don’t drizzle it over the peach danishes pictured above. But, beef, chicken, pork, fish, pasta salad, sandwiches, eggs, and absolutely any kind of vegetable?
Oh yes, definitely.
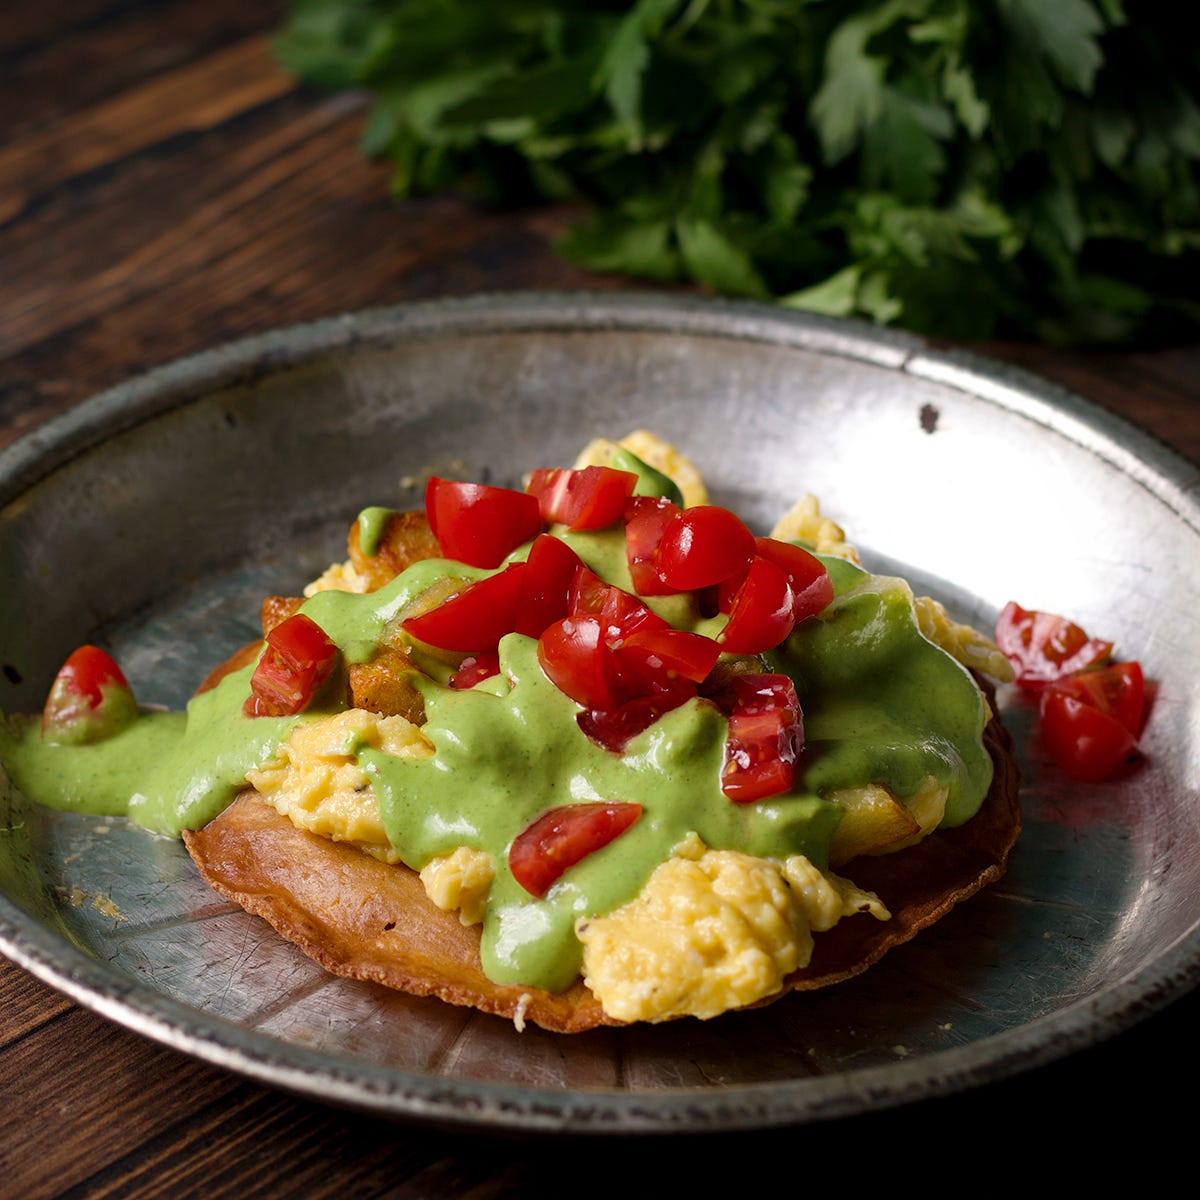
The day I made this so I could take photos for this newsletter, we ate it over breakfast tostadas with olive oil scrambled eggs and country fried potatoes, and some chopped tomatoes.
And, because we had plenty leftover, I cooked some chicken sausages for dinner and we dipped them in the sauce. Then, the next day I made open face grilled portobello and fried egg sandwiches spread with a thick layer of aji verde sauce.
So good. All of it.
There’s plenty of room to play around here, so experiment with ingredient amounts to suit your preference. The ingredient amounts are only there for reference. And if you want the sauce to be thinner, just add a few more tablespoons of water.
Also, if you’re curious, “aji” means chili pepper and “verde”, of course, means green.
Ingredients:
4 - 5 tablespoons extra virgin olive oil
1/2 cup mayo
3 ounces (about 1 heaping cup ) grated parmesan or cotija cheese
1 jalapeño pepper (or any kind of pepper), stem and seed removed
1 1/2 cups fresh cilantro and/ or parsley - use a combination of the two or just one or the other
3 cloves of garlic (more to taste)
The juice from one lime
A pinch of salt
2 tbsp water - more if you want the sauce to be thinner
Add everything to a high powered blender and blend on low to medium speed until smooth and creamy. The herbs can get tangled around the blades, so stop and use a spatula to move everything around if you need to.
Alternatively, you can use a food processor. Using a food processor will produce a slightly chunkier sauce that’s no less delicious.
If you find that you like a chunkier texture, more along the lines of chimichurri sauce, use more olive oil and less mayo (or omit the mayo completely) and process the ingredient in pulses, stopping to scrape down the sides of the bowl several times, until it’s the consistency you want.
Angel biscuits
No featured cookbook this month (that segment will be back next month). Instead, I want to share another of my Grandma’s recipes.
In case you missed it in Issue #14, many years ago my Grandma and Grandpa gave all their kids and grandkids a binder containing my Grandma’s favorite recipes. I’ve been sharing a few of them in the last couple of issues, and this week I want to share her recipe for yeast raised biscuits, aka Angel Biscuits
These are aptly named. They are light and airy enough to float right off your plate.
I’ve played around with my Grandma’s recipe and what you see here is different from hers, both in technique and the ratio of ingredients, but the idea is the same. Also, this recipe makes a lot less. Her recipe made 2 1/2 dozen and I figure few of us have need of baking that many biscuits in one go.
Her recipe called for vegetable shortening so one of the first experiments I did with this recipe is to swap it out for butter. The resulting biscuits had more flavor, but lacked the light, airy texture and didn’t rise as well. I’ve settled on half vegetable shortening and half butter, which produced the best of both worlds - a texture worthy of the name Angel and a rich, buttery flavor.
I also used a combination of all-purpose flour and cake flour to cut back on the amount of protein in the dough. This created an even more tender crumb. You could also use white lily flour, which only contains about 9% protein (all-purpose flour contains about 11% protein, cake flour has about 7%).
Her recipe calls for allowing them to rise for an hour and a half at room temperature and baking them on a baking sheet. I opted to proof the dough in the refrigerator and then bake the biscuits cold in a cast iron pan. This helped the biscuits rise much higher and made them extra fluffy.
Here’s how to make them:
1/4 cup lukewarm water
1 tablespoon of sugar
2 1/4 teaspoons (1/4 ounce) active dry yeast (rapid rise is also fine)
1 1/2 cups of cake flour
1 cup all-purpose flour
3 tablespoons granulated sugar
1 teaspoon baking powder
1/2 teaspoon baking soda
1 1/4 teaspoons salt
1/4 cup butter - plus more for brushing over the tops of the biscuits
1/4 cup vegetable shortening
1 cup buttermilk
Pour the water into a small bowl and stir in 1 tablespoon of sugar and the yeast. Let the mixture sit for 5 minutes at which point the the yeast should be active and creamy.
Add both flours, 3 tablespoons sugar, baking powder, baking soda, and salt to a food processor and pulse a couple of times to combine.
Cut the butter into 1-inch pieces and add it to the bowl of the food processor along with the shortening. Pulse until the mixture resembles coarse crumbs.
Add the yeast mixture and the buttermilk and pulse just until the mixture starts to come together into a dough.
Scrape the mixture into a bowl (it will be very wet and sticky), cover the bowl, and refrigerate for at least 2 hours (or up to 24 hours).
When you’re ready to bake, smear the inside of a cast iron pan with vegetable shortening.
Turn the dough out onto a lightly floured work surface and knead a few times just until it forms a smooth, cohesive dough. Add as much flour as you need to keep the dough from sticking to everything, but no more than what is necessary.
Pat or roll it out into a rectangle that’s about 1-inch thick. Fold one side of the dough to the center, then fold the whole thing over again, like you're folding a letter.
Give the dough a quarter turn and roll or pat it out into a 1-inch thick rectangle again. Repeat the folding process, give the dough a quarter turn, and then repeat the folding process once more.
Roll or pat the dough back out into a 1-inch thick rectangle and use a biscuit cutter to cut out the biscuits. (Don’t twist the biscuit cutter; this will prevent them from rising as high) Reroll the dough as necessary, cutting out biscuits until you have 7 - 8 large biscuits or 12 - 14 smaller ones.
Place them close together in the cast iron pan so their sides are touching. (As they bake they will press into each other and that will help them rise higher.) Cover with plastic wrap and put the pan in the refrigerator for 10-20 minutes.
Heat the oven to 400 degrees, brush the tops of the biscuits with about 1 tablespoon of melted butter and place the pan in the oven. Bake for 10 - 16 minutes, depending on the size of the biscuits. When done, the tops will be a light golden brown and will appear set, not doughy.
Strawberry Shortcake with Vanilla Ice Cream
The main reason why I am including a biscuit recipe in the middle of a heat wave is for strawberry shortcake. Christina over at Sunny Side Breakfast and Desserts makes her strawberry shortcake with ice cream instead of whipped cream and that is a swap I am 1000% into.
Angel biscuits are PERFECT for strawberry shortcake. We ate these on a 95 degree day and I’m not sure anything has ever tasted sweeter.
Make a batch of Angel biscuits and let them cool.
Slice some strawberries and any other kind of berry, or any kind of fruit, and add them to a bowl. Sprinkle in a tablespoon or so of sugar, toss everything around, and let them sit until the sugar has dissolved and there is some juice in the bottom of the bowl (about 20 minutes).
Cut the biscuits in half, spoon on some berries, a scoop of ice cream, more berries, the other half of the biscuit, another scoop of ice cream, and more berries.
Thanks for reading! Paid subscribers receive three issues a month plus additional bonus content, and have access to the full recipe archives. So if you are enjoying this newsletter, please consider upgrading your subscription for $5 a month or $50 a year.
If you make something from this issue, have any questions or anything you’d like to share, add a comment below. I ❤️ to hear from you. And if you are enjoying this newsletter, please tell your friends!








Just WOW... these Angel Biscuits look amazing! I'm saving this recipe and I'll be serving them for the holidays ... probably sooner!!!
You and your husband are so cute. Such a great example of a couple going out there and living their best lives. 💖