

Issue #6, The Costa Rica Issue
Let's Get Lost, March 16, 2024

In this issue
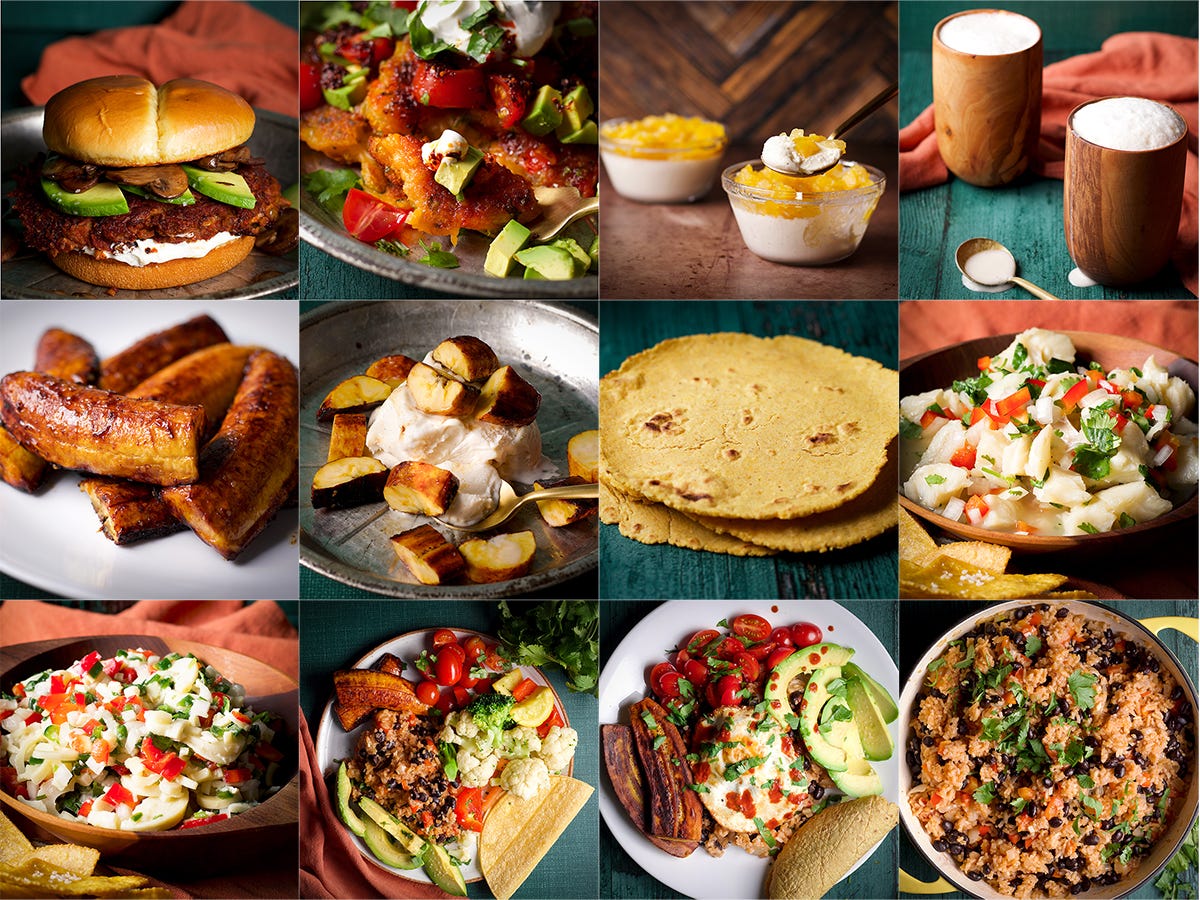
+ What we love about Costa Rica plus ELEVEN (11!) new recipes inspired by our time there
+ What to make this week
A quick note before we get to it, the length of this post means it might be truncated in your inbox – just click to expand and read the whole thing or read it directly on rebeccablackwell.com.

The first time we went to Costa Rica I was just tagging along on one of Steve’s work trips. It was in the middle of their rainy season and I was sick with bronchitis the entire week. It rained every day all day and I had to overcome my embarrassment over my constant hacking because I’ll be dammed if I was going to just stay in the hotel room all week.
Despite the enormous amount of rain and coughing, we fell in love with Costa Rica almost instantly and decided then and there to plan a return trip.
The return trip took the form of a family Christmas present and the 5 of us spent a week on the Caribbean coast of Costa Rica in January of 2019. Despite a bout of food poisoning that took us all down for about 24 hours, we went jungle hiking with the monkeys and sloths, dolphin watching, toured a chocolate farm, explored several costal towns, and spent hours on the beach that was right across from our rental house. I have many good memories of that week.
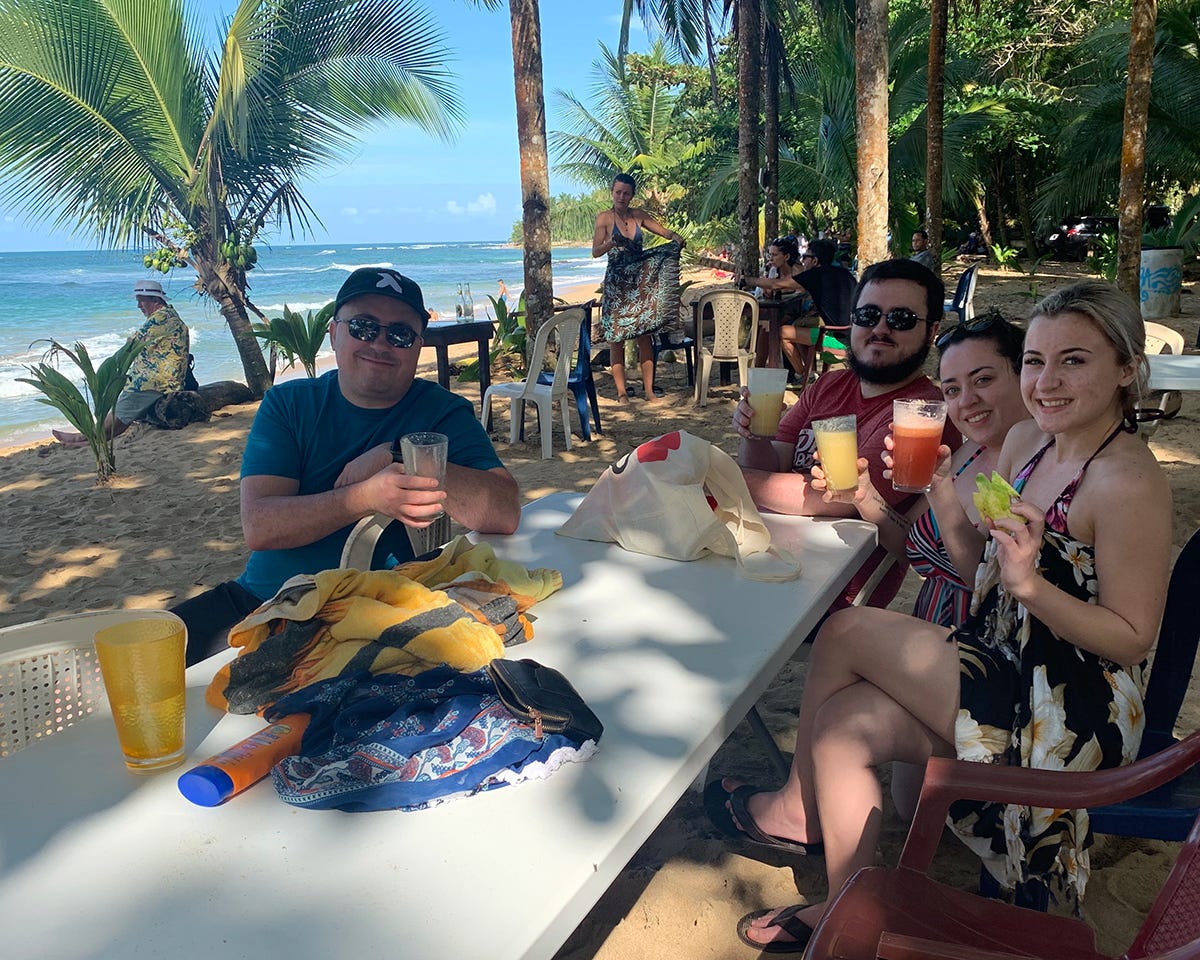
Our most recent trip was just a few weeks ago and it was just Steve and I, much to the chagrin of our girls who gave us so. much. grief about not taking them with us. 🤷🏻♀️
This time around we spent a few days in the capital city of San Jose then drove up into the central mountains, spending time in Cuidad Quesada, La Fortuna, and the Pacific coast.
If you are ever planning a trip to Costa Rica, please reach out. I’ll happily share our experience and have many recommendations to offer. What I really want to share with you today is not what we did while we were there but why we love Costa Rica so much.
I think I could boil it down to three things:
the people
the location
the food
The people!
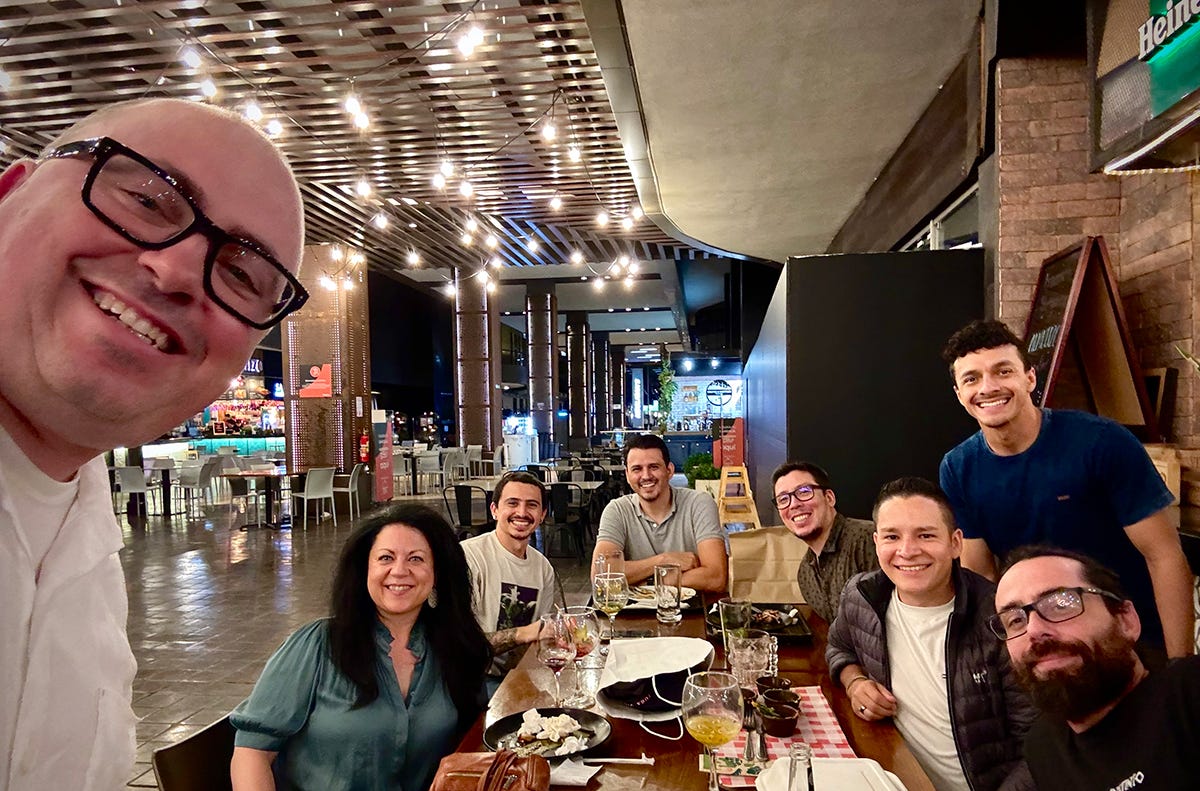
The real motivation for our visit to Costa Rica this year are the guys in this photo. All of them either work with Steve now or have worked with Steve in the past and I think you’d be hard pressed to find a better group of humans. They are some of the most genuine, hard working, open hearted, kind people we’ve ever met and getting to spend a couple of evenings with them was the highlight of our trip.
But, this has been our experience with people all over Costa Rica. They are welcoming and warm, helpful and accommodating, friendly and generous.
They are proud of their country in a way that makes them want to share it with you. Everywhere we went, it seemed that people were genuinely excited for us to see and experience all that their country had to offer. They love Costa Rica and they want you to love it too.
A couple of examples: While in La Fortuna we booked a sunset boat tour on Lake Arenal. The day of our tour was overcast and rainy so we arrived to find that we were the only two people on the boat that night. Rather than try and reschedule us for a different night, the tour guide seemed to relish the opportunity for a more intimate discussion of the history and culture of the area. He had lived there his whole life and told us stories of his father and grandfather, who had also lived in the area their whole lives. He was a treasure trove of information and his enthusiasm for his country was contagious.
At our hotel in San Jose, an elderly man who worked the hotel’s breakfast buffet welcomed me each day with a “Buenos días señorita” and then followed me around holding a tray while I selected the items I wanted that morning.
The airbnb hosts of the home we rented in La Fortuna provided us with a 20 page guide filled with information about things we might want to do, restaurants they recommended, where to buy groceries, where to get cash, and other tidbits of information to helps us experience all the town had to offer.
You cannot step foot into Costa Rica without hearing the phrase “pura vida”. It’s spoken everywhere, by everyone, all across the country. It means pure life and I cannot think of a better way to it encapsulate Costa Rican culture.
The location!
Maybe the people are so friendly because it’s impossible to not be happy when you live in a place that looks like this.

The country is located in a mountainous area with the Pacific Ocean on one side and the Caribbean Sea on the other. The country is smaller than the state of West Virginia but includes 200 volcanoes, mountains that ascend into the clouds, creating a literal cloud forest, 800 miles of coastline, six different kinds of rain forests, swamps, wetlands, rivers, lakes, and over 400 waterfalls.
It doesn’t actually matter where you choose to go in Costa Rica. It’s all beautiful.

The food!
We had so much good food in Costa Rica. I think you’d have to really work at it to not eat exceptionally well while visiting there. Everywhere you turn there are many different kinds of restaurants, markets, and sodas - small, local Costa Rican restaurants that serves only traditional Costa Rican food. And almost all of it is good.
In the rest of this issue, you’ll find 11 recipes that I recreated from the memory of meals we enjoyed on this last trip but there very well might be more to come in future issues because we enjoyed many memorable meals. Like this one in San Jose - a restaurant in a hole-in-the-wall building in a non-descript neighborhood that had transformed the inside of the tiny building into a lush oasis and served us an incredible seafood lunch.

There are not very many places that change the way we eat on a day-to-day basis, but Costa Rica has done that. I never truly appreciated the delicious, satisfying simplicity of well seasoned, flavorful rice and beans and a stack of warm homemade corn tortillas but since we’ve returned there’s been some in our refrigerator at all times. (Both recipes are included below.)
After seeing yucca in the supermarket for years, I finally started cooking with it and I’m pretty sure savory yucca and sweet potato cakes are well on their way to becoming normal lunch fare around here. (Recipe below)
For those of you who’ve read The Blue Zones: Lessons From the Healthiest Places on Earth, you might remember that a community in Costa Rica is one of the places featured in the book. I read the book years ago and had forgotten about that but was so pleased to discover the Blue Zones Cookbook while we were there. I purchased a copy and it’s influence is represented in the recipes below. (I’ll also be sharing recipes from the book next month.)
Costa Rica, we ❤️ you and we hope to see you again soon.
And regardless of whether you’ve been there before or haven’t yet had the opportunity, I hope a trip to Costa Rica is in your future.
What to eat this week
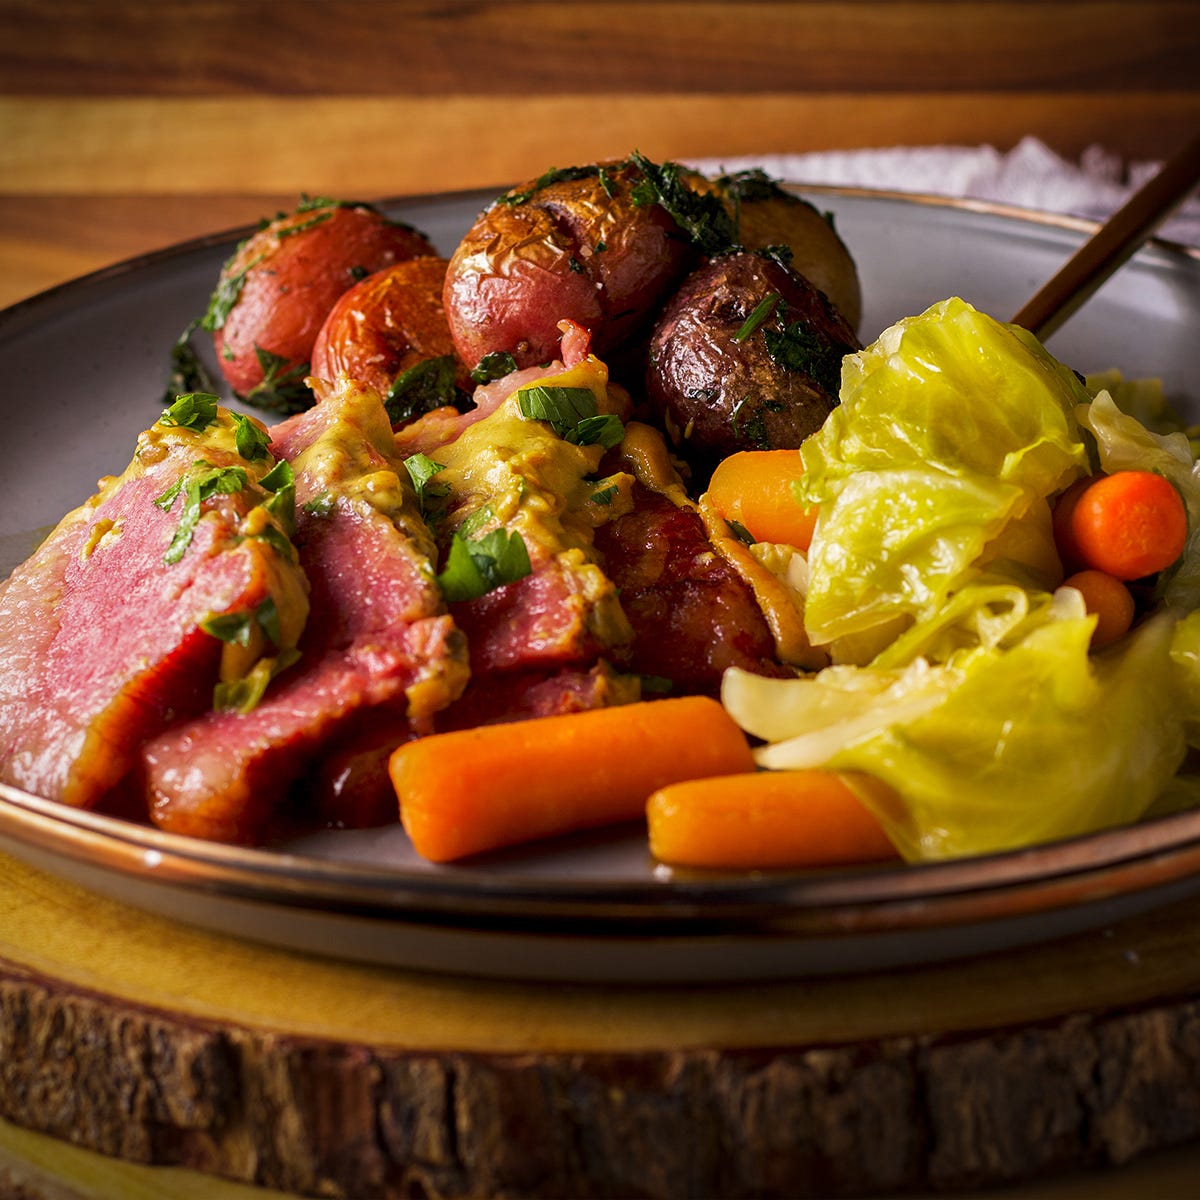
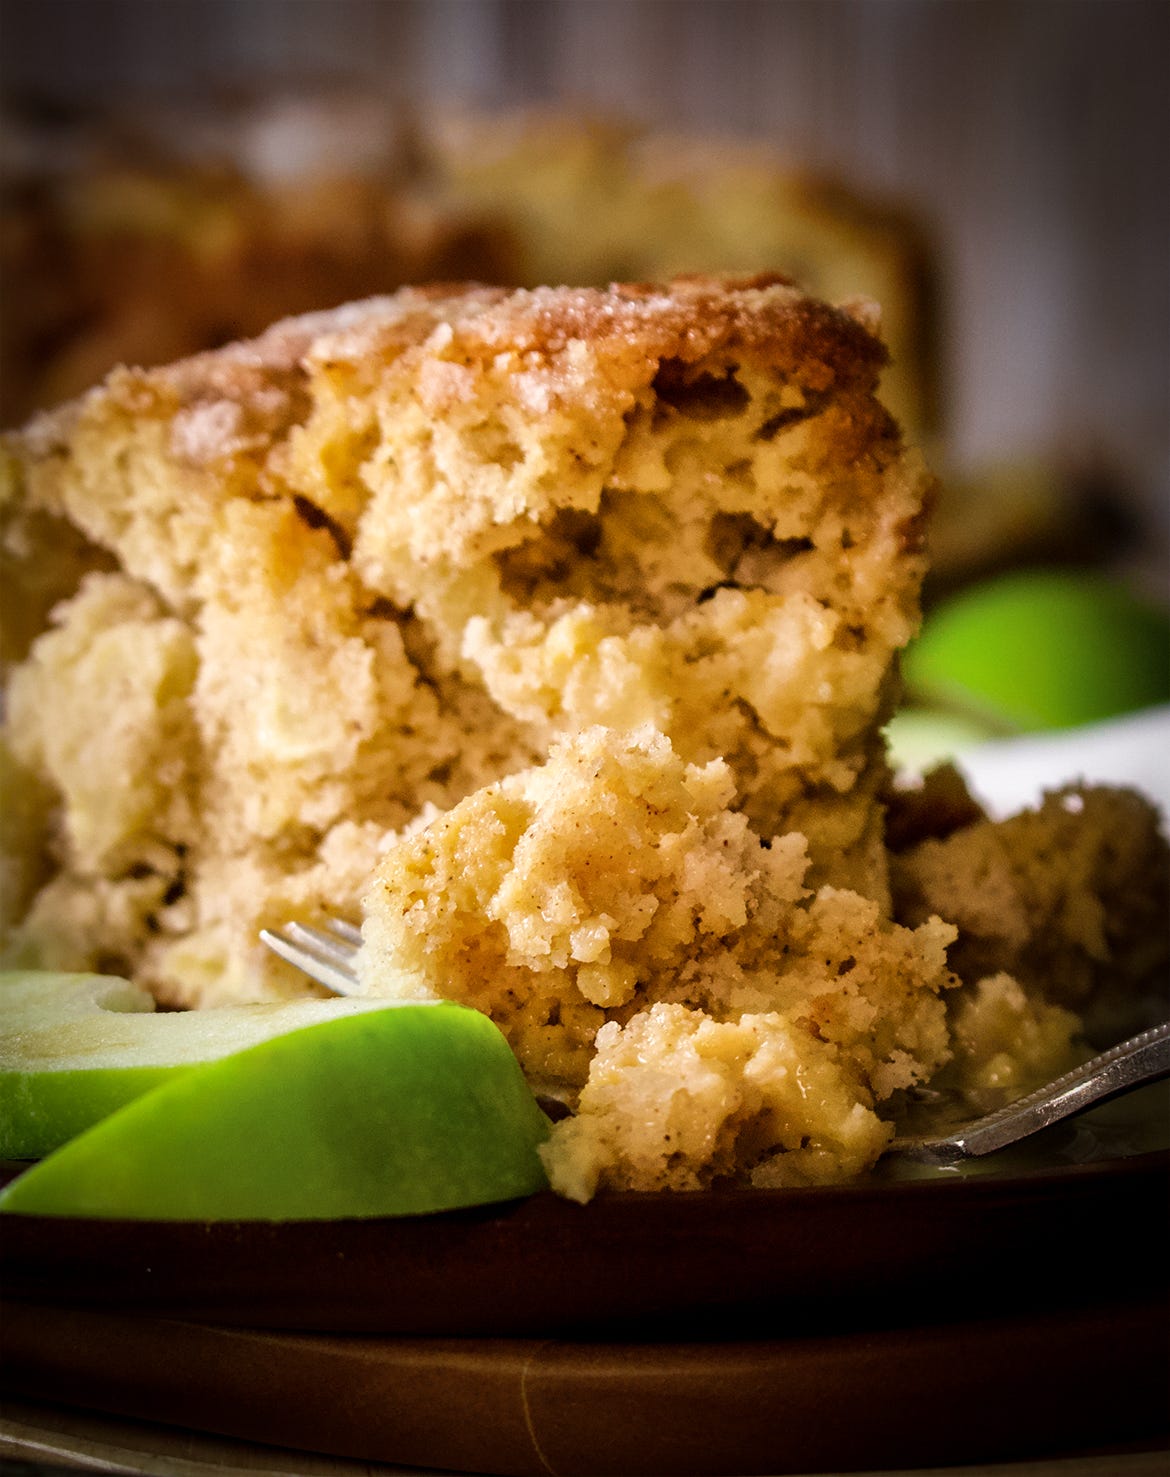
Saint Patrick’s Day is tomorrow, which means we are eating corned beef and cabbage with mustard sauce and parsley buttered potatoes and Irish apple cake, and I hope you are too because YUM.
I always make extra corned beef so we have enough left over for corned beef hash and reuben sandwiches later in the week. This recipe for corned beef hash is more of a basic formula for how to make hash with pretty much any kind of leftover meat or veggies. But, corned beef and potatoes is my favorite.
And this recipe for reuben sandwiches is made with toasted slices of dark rye bread packed with corned beef, sauerkraut, Swiss cheese and tangy homemade Russian dressing. They are overstuffed, messy and sloppy, and dripping with sauce and cheese, as all good sandwiches should be.
Just a reminder that Irish Apple Cake is this month’s bake club challenge recipe, so if you make it, be sure to leave a comment on the recipe so you’ll be entered into the drawing for a $50 Amazon gift card.
To participate in the Bake Club Challenge: bake an Irish apple cake, and then leave a comment on the recipe telling me what you thought of it! By commenting on the recipe, you'll be automatically entered to win a $50 Amazon gift card. Bake the challenge recipe and leave your comment before April 1st, 2024.
Recipes with frozen berries
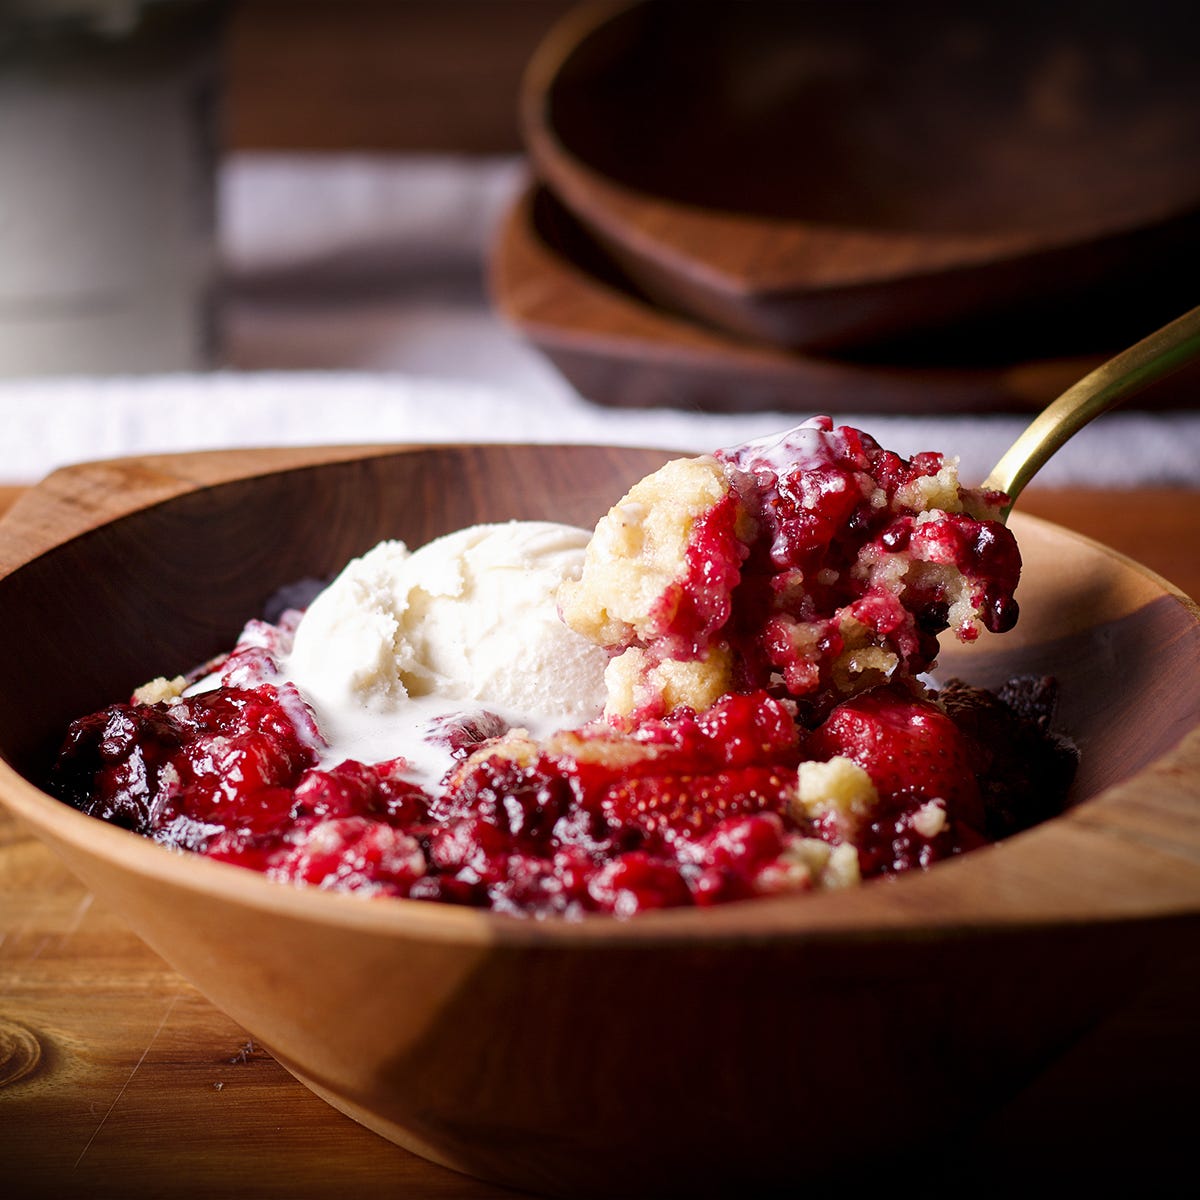
We are so close to fresh berry season and I am giddy with anticipation. And honestly, it’s fine because until then we have frozen berries. If you’re getting as antsy for spring as I am, perhaps a couple of these bright, fresh, berry recipes are exactly what you need.
#1. Easy berry sauce: It doesn't get any easier than this 10-minute berry sauce. Use whatever kind or combination of berries you like, fresh or frozen, to make this delicious dessert sauce that's bursting with the flavor of ripe, juicy berries.
My favorite things to cover with berry sauce are chocolate ricotta cake, vanilla loaf cake, and buttermilk pancakes.
#2. Berry Cobbler: The fruit filling in this cobbler is slightly tart, not too sweet, and super saucy and the topping is soft, tender, and chewy like the very best kind of sugar cookie. It's equally delicious with fresh or frozen berries and the whole thing takes about 10 minutes to throw together before baking.
#3. Raspberry muffins: rich, decadent, and buttery little breakfast pastries packed with berries. The crumb is exceptionally soft and tender, a perfect match for delicate, sweet raspberries. And the butter crumb topping literally melts in your mouth.

More frozen raspberry treats:
More frozen berry recipes:
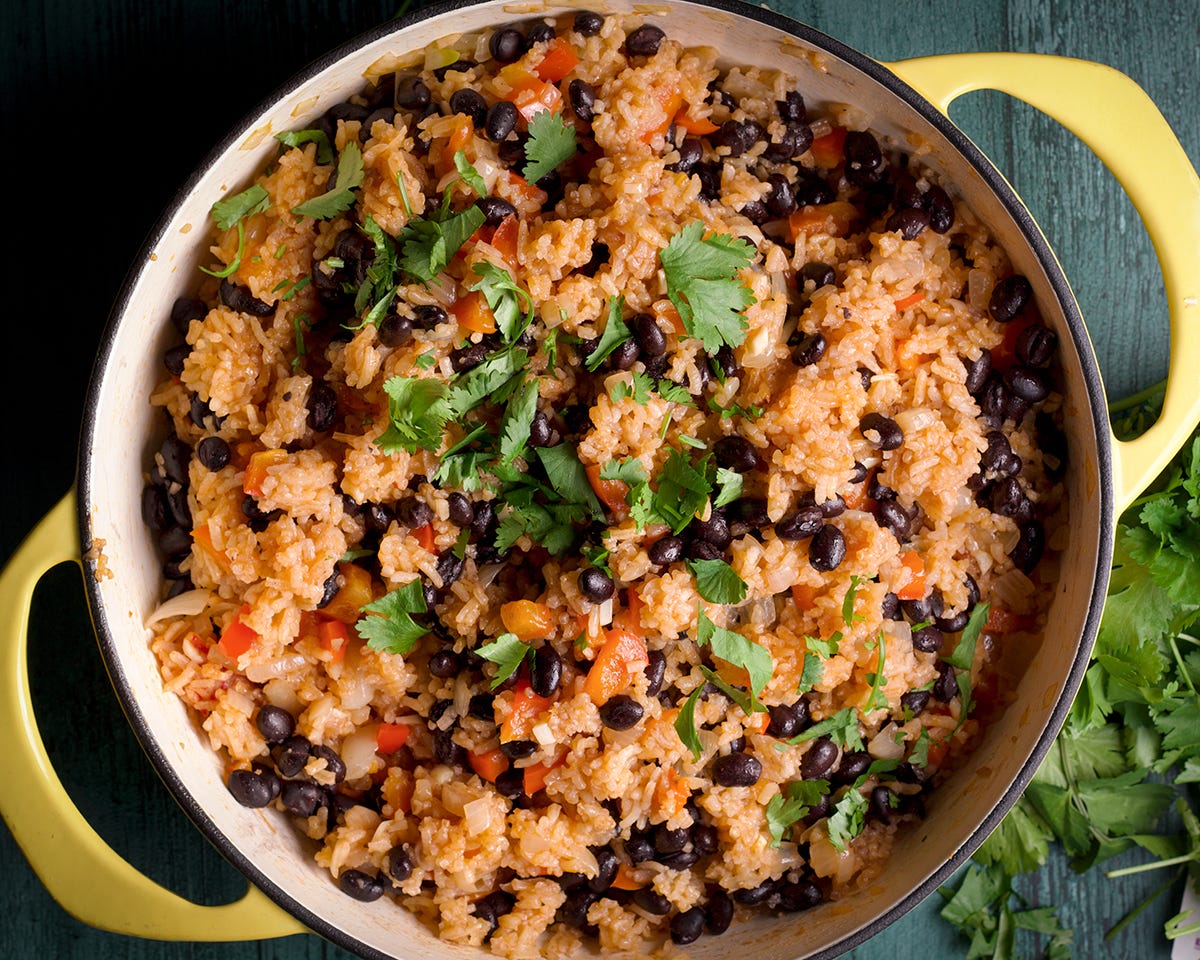
Beans and rice (Gallo pinto)
—> FREE EMAIL BONUS: How to turn a pot of beans into a week of dinners
Beans and rice are as essential to traditional Costa Rican food as butter is to French cuisine. In many parts of the country, it is eaten at every meal, breakfast, lunch, and dinner. So, this is where we begin, with a simple pot of beans and rice that is, in fact, delicious enough to eat every day.
You’ll find variations of beans and rice all across Costa Rica, but the basic idea is the same. In most cases, the rice is cooked separately then added to a skillet of sautéed garlic and onions along with black beans. In this recipe, I’ve cooked everything in the same pot.
Ingredients
1 cup rice - long grain white rice is traditional, but you can use any kind of rice you like
2 tablespoons vegetable, canola, or extra virgin olive oil
1 medium yellow onion, peeled and diced
1 red bell pepper, seeds and stem removed and diced
2-4 cloves garlic, peeled and chopped
2 cups water or broth (I used water mixed with Better than Bouillon Vegetable Base)
2 tablespoons Worcestershire sauce
1 tablespoon tomato paste (optional)
1 1/2 cups black beans - this is the amount in a 15 ounce can of black beans, or here’s how to cook dried black beans
Salt and pepper to taste
For serving (optional): sliced avocado, hot sauce, chopped fresh cilantro, diced tomatoes, and pickled onions (Pickled onions are not traditional to Costa Rican cuisine at all, we just really like them on there, especially when eating beans and rice on a warm tortilla like a taco.)
Instructions:
Add the rice to a fine mesh strainer and rinse it under cold water until the water runs clear.
Add the oil, diced onion, red pepper, and garlic to a large saucepan or braiser. Set the pan over medium heat and cook until the vegetables are beginning to soften and the onions are starting to look translucent, about 2-3 minutes. Add the rice and cook, stirring, for another minute or two.
Stir in the water or broth, Worcestershire sauce, and tomato paste and turn the heat up to high. When the liquid begins to boil, turn the heat to low, cover the pan, and cook until the rice is tender, about 20 minutes.
Stir in the beans and season to taste with salt and pepper. Serve as is or with any or all of the suggested toppings.
Homemade corn tortillas (Nixtamal tortillas)
Nixtamel refers to corn that has been soaked and partially cooked with lime (or wood ash). The lime or ash releases the niacin in corn which is good for us and good for digestion. Ancient Aztecs discovered this benefit from grinding their corn against limestone thousands of years ago.
Like homemade flour tortillas, homemade corn tortillas are incomparably better to the packaged store-bought variety. They are also very easy to make. And I know, I know some of you are rolling your eyes and thinking, sure they are - but they require nothing more than mixing 4 ingredients into a dough, pressing them into tortillas and cooking them for a few seconds in a hot skillet.
So yes, opening a package of tortillas is easier. But in exchange for a few minutes more, you can have warm, soft, homemade tortillas that are just so much better.
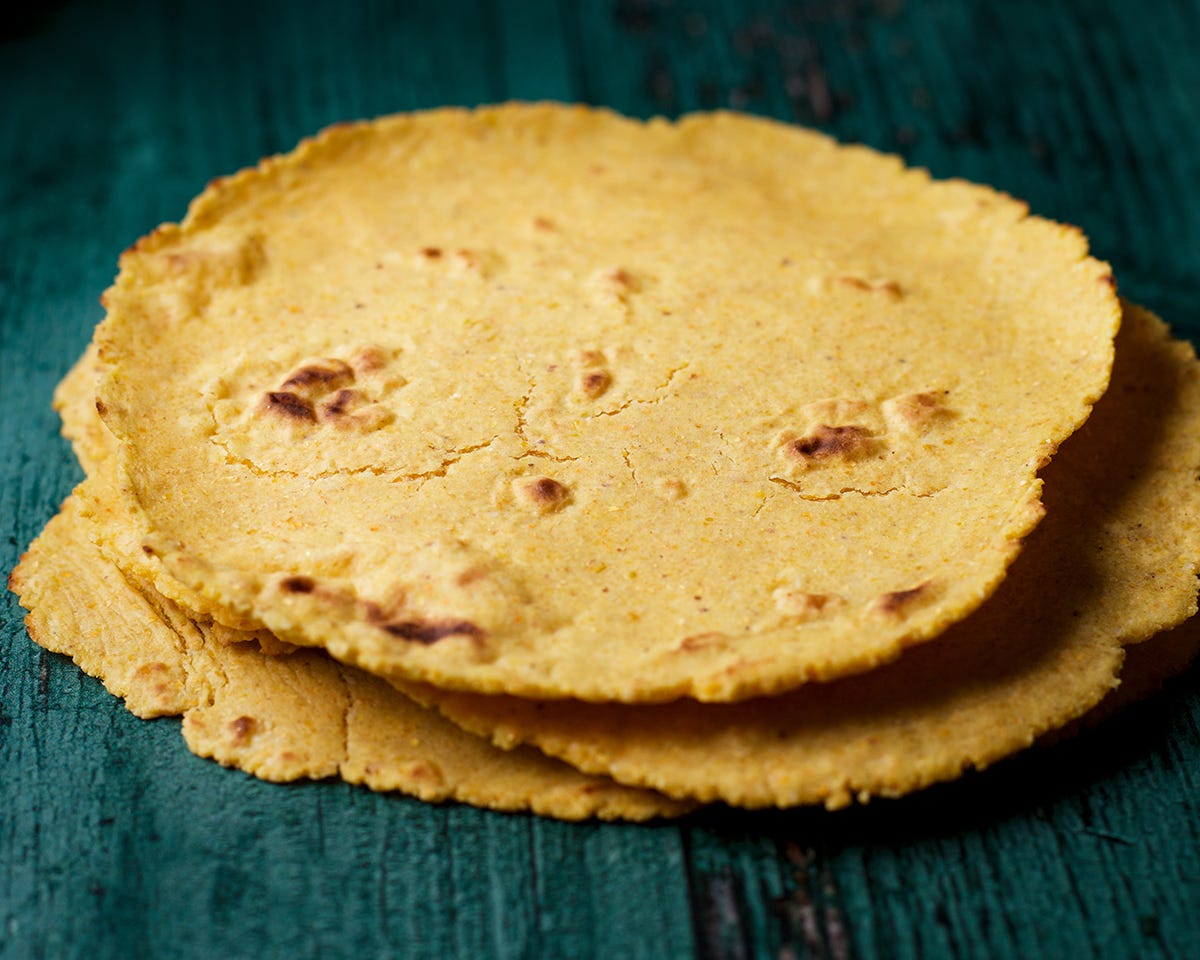
Having just told you how easy these are to make I feel I should confess that until our recent trip to Costa Rica, it had been years since I’ve made them. I make homemade flour tortillas frequently and used to also make corn tortillas. But then I got lazy and started buying them and forgot how much better they are freshly made and hot from the skillet. Now I remember. And, once again, I’m not sure I can ever go back.
1 cup masa harina (I like Bob’s Red Mill masa harina)
1/8 teaspoon baking soda
1/4 teaspoon salt (more to taste)
3/4 cup warm tap water
Add the masa harina, baking soda, and salt to a bowl and stir with a wire whisk to combine. Add the water and mix until a soft dough forms. If the dough is too dry to form a ball, add more water, a little bit at a time, until you can press the dough into a ball. Wrap it in plastic wrap and let it rest for 5 minutes.
Unwrap the dough and knead it for a minute or two. It should be the consistency of play-dough. If it feels dry and crumbly, sprinkle more water over the dough and knead to incorporate. If it’s wet and sticky, sprinkle it with more masa harina.
Divide the dough into 8 balls of equal size. Cover the balls with plastic wrap so you can work with one ball at a time and they won’t dry out.
Place one ball of dough in between two pieces of wax paper and press it into a disk. Use a rolling pin to roll the dough into a round, thin tortilla. Alternatively, use a tortilla press to press the dough in between two pieces of wax paper into a tortilla.
Stack the raw tortillas with pieces of wax paper in between them. When they are all rolled out, set a skillet over medium-high heat. When the skillet is hot enough for a drop of water to skip across the bottom of the pan and evaporate, add the first tortilla.
Cook for about 10 to 15 seconds then flip it over and let it cook until the edges are dry, another 20-30 seconds. Flip the tortilla over again and press it down into the pan with a flat spatula to encourage puffing. Cook for another 10 seconds, until brown spots appear over the bottom then flip it once more, press with the spatula, and cook until brown spots appear on the other side.
Remove the tortilla from the skillet and repeat with the remaining dough.
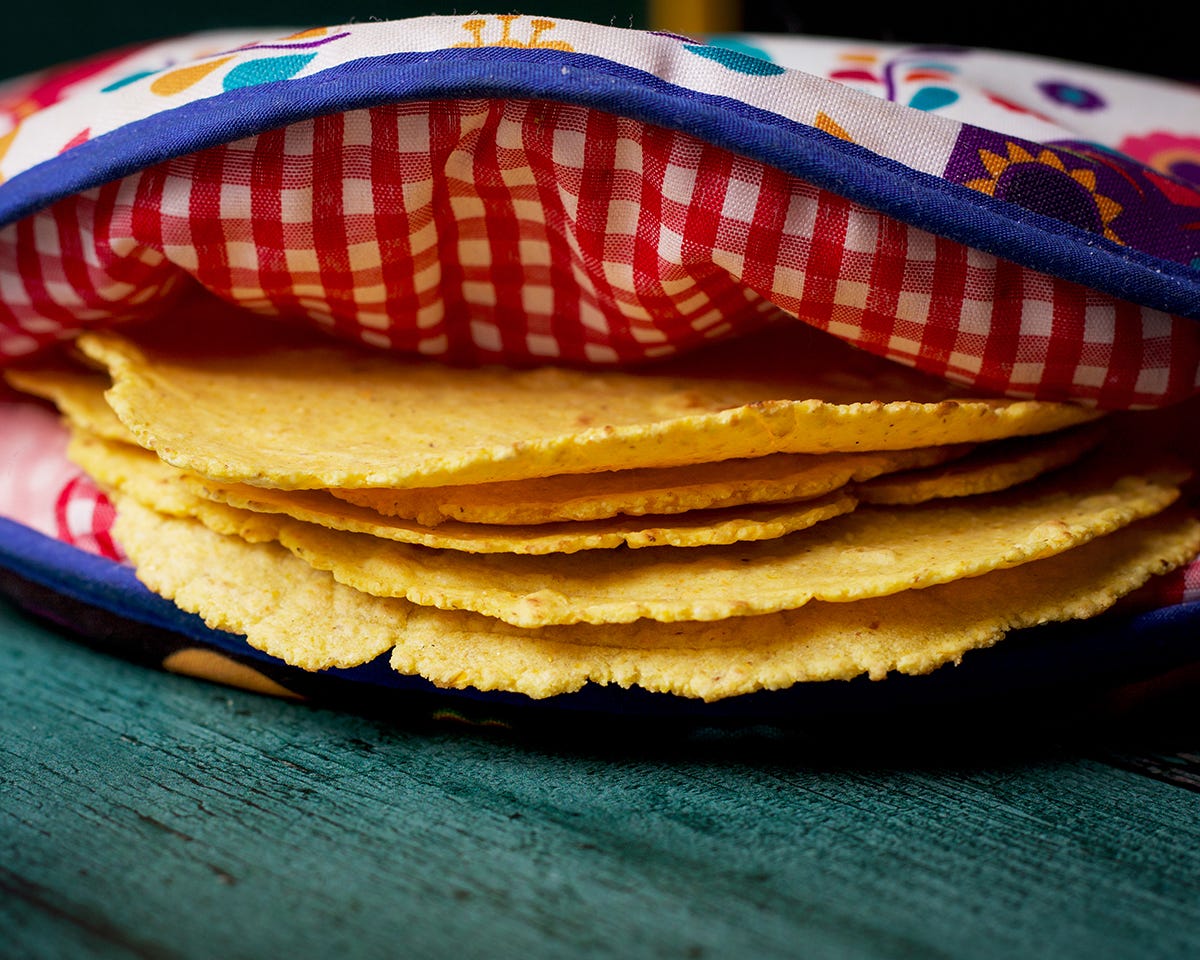
I like to place the tortillas in a tortilla warmer pouch as they come off the skillet which will keep them warm and soft for quite some time - an hour or longer.
The rest of this issue, which includes 9 more recipes inspired by our recent trip to Costa Rica, is for paid subscribers. Subscribe now for just $5 a month or $50 a year. ❤️
Fried Plantains, green or ripe, with or without sugar
Plantains are to Costa Rica what potatoes or bread is to the USA. They are everywhere and used in a multitude of ways. We ate them nearly every day while we were there because they come with everything. Much of the time they are fried, sometimes plain and sometimes with a bit of sugar.
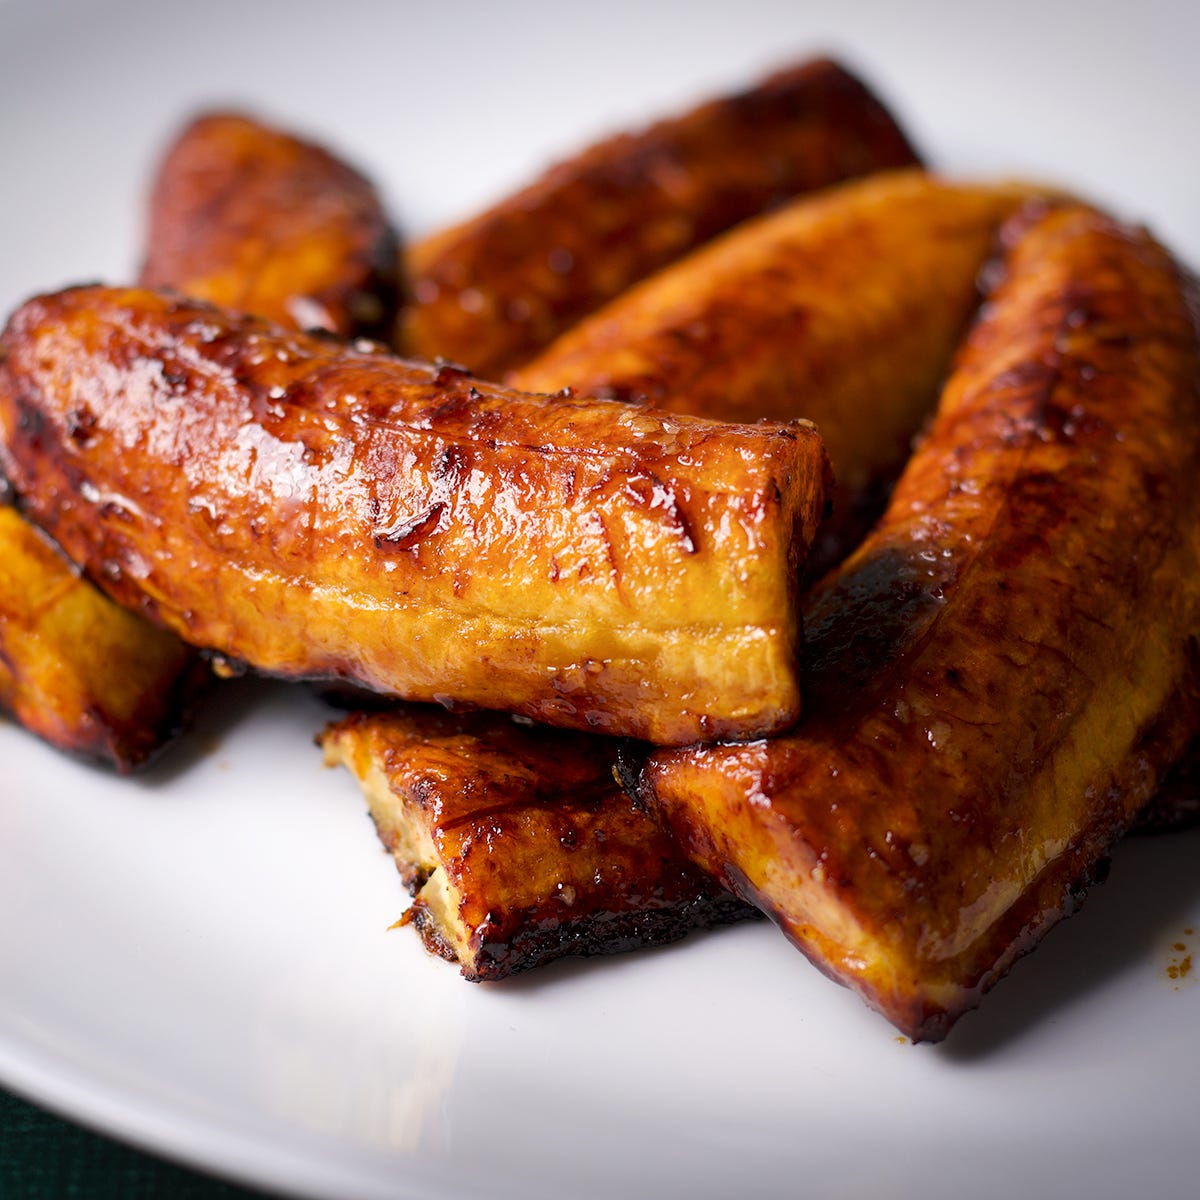
1 large plantain: the more dark spots the plantain has, the sweeter it will be. For savory dishes, plantains are generally fried when they are green, with minimal black spotting on the peel. But, they are also delicious fried when ripe (with lots of black spots). It’s really just a matter of preference.
2 tablespoons vegetable or canola oil
2 tablespoons salted butter
Salt to taste
Remove the peel from the plantain and cut it in half crosswise. Cut each half lengthwise so you have 4 “halves”. (See the photo) Alternatively, you can slice the plantain into thick round pieces.
Add the oil and butter to a skillet and set it over medium heat. When the butter has melted, add the pieces of plantain, cut side down. Cook the plantains for 2-3 minutes, until the bottom is a light golden brown. Flip them over and cook on the other side for 2-3 minutes until light golden brown on the other side. Remove to a paper towel lined plate.
Immediately, use a spatula to press them, flattening them to about half their thickness. Return the plantains to the hot skillet and cook, flipping as needed, until both sides are a deep golden brown. As they cook, sprinkle with a bit of salt if desired.
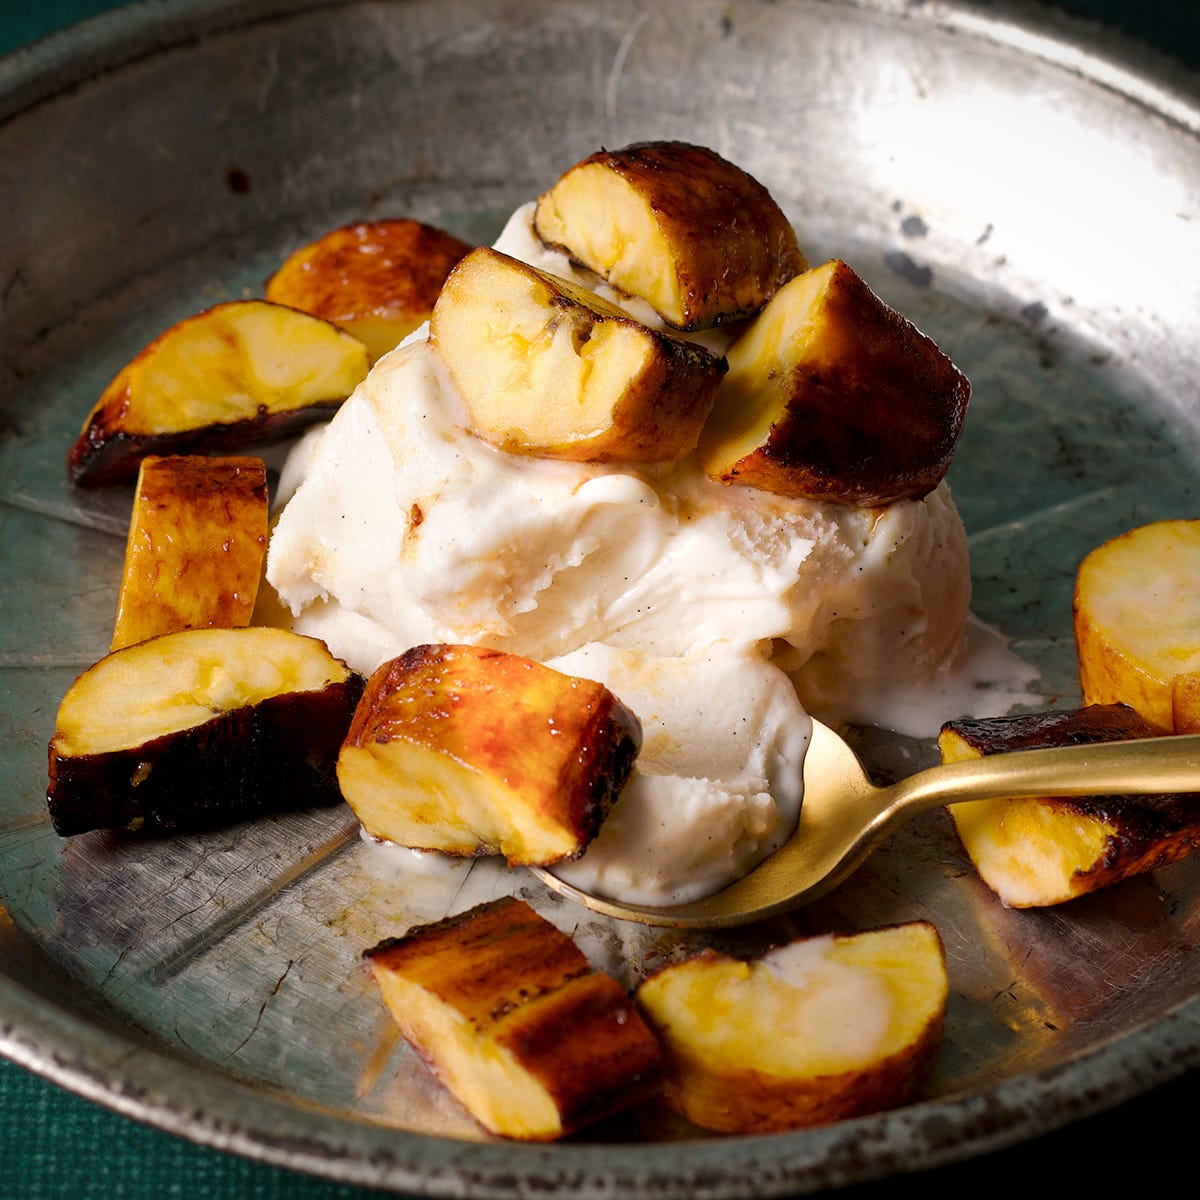
For sweet, caramelized plantains:
Sprinkle a couple tablespoons of brown sugar onto a plate and then press the raw, cut plantains into the sugar to coat them lightly on both sides. Cook as directed above, but do not place them on paper towels because their sticky, caramelized exterior will stick.
Caramelized plantains are delicious served for dessert with ice cream, crème fraîche, or yogurt. But, I also like to serve them sometimes with savory meals when their sweet, sticky flavor might compliment and balance a dish that’s salty and/or spicy.
Beans and rice with eggs, veggies, tortillas, and fried plantains
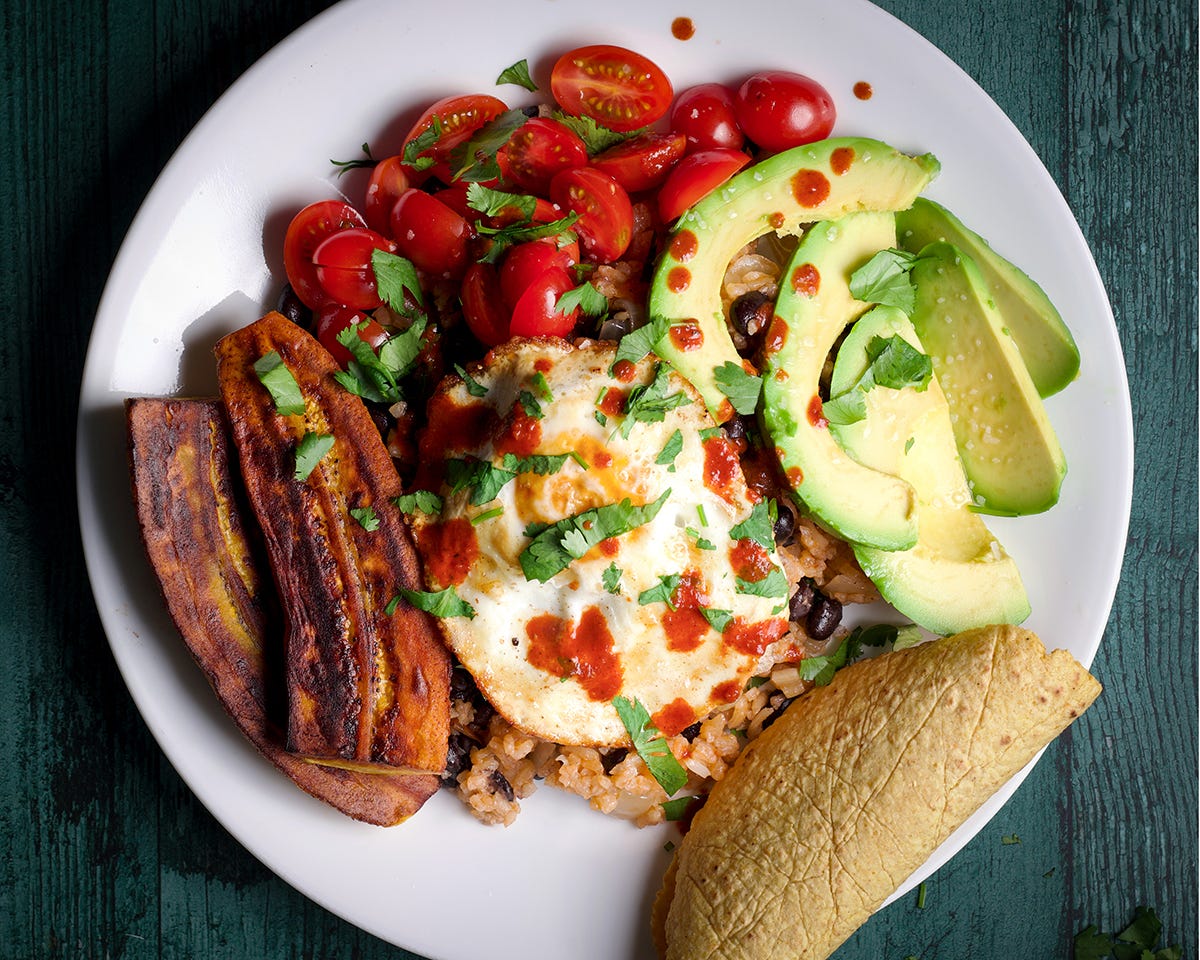
This is the type of meal many people associate with a Costa Rican breakfast but can just as easily be eaten for lunch or dinner.
My husband and I are not big breakfast eaters so we at the exact plate you see pictured here for lunch the Monday after we returned home. It was cold and a little bit snowy outside, but as long as we didn’t look out the windows, we could pretend we were still on vacation. 🙂
Here’s what we’ve got going on here:
Beans and rice topped with a fried egg
Slices of avocado, sprinkled with salt
Sliced cherry tomatoes, sprinkled with salt
Fried plantains without sugar
Homemade corn tortillas
Chopped fresh cilantro and hot sauce
Costa Rican cuisine is not spicy. Most traditional dishes do not include peppers and even when something says it’s a bit spicy, it’s probably very mild. The exception is the Nicoya region where people often like to top their beans and rice with hot sauce. In the photo you see here, I took a cue from the people of Nicoya and doused our plates with a hot sauce made from chilies and garlic.
But, in most parts of the country if you ordered a plate similar to this, it would be served with Lizano Salsa Sauce, the most common condiment in Costa Rica. The flavor if the sauce is similar to Worcestershire - slightly sweet and tangy, with a hint of black pepper and cumin.
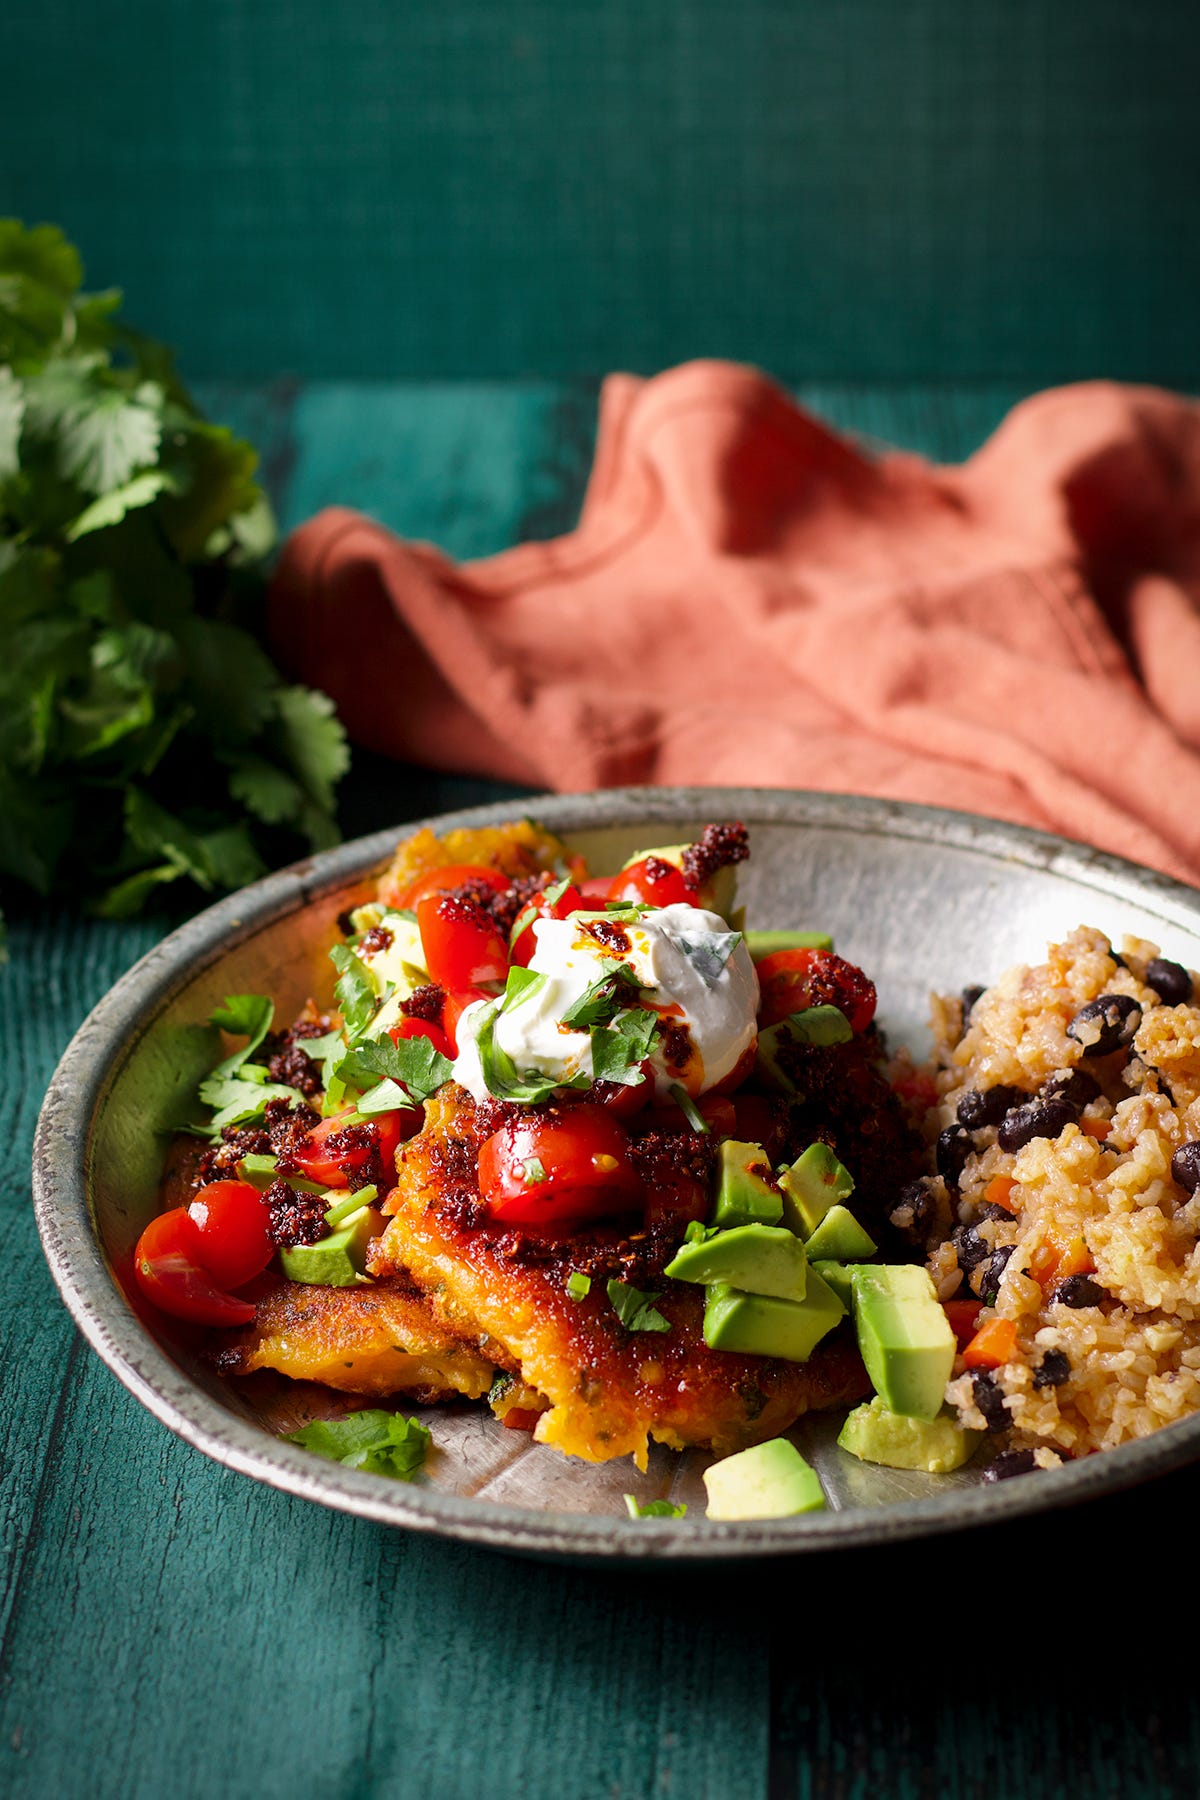
Yucca cakes
Making these yucca cakes was the first time I’d ever cooked with yucca and I have been missing out! We had yucca several times in Costa Rica, cooked in a variety of ways, so I was anxious to play around with this starchy root vegetable.
Yucca in Costa Rica is what potatoes are in the US. It can be boiled, baked, fried, or mashed. It’s inexpensive, versatile, and a staple food for families across the country and in much of Latin America.
In this recipe, I boiled yucca with sweet potato then mashed them together along with garlic, red bell pepper, and scallions then fried them into tender, delicious little cakes. Topped with avocado, tomatoes, sour cream, and chili oil, these made a delicious lunch that I will make again and again.
Ingredients:
2 pounds yucca and/or sweet potatoes (I used a combination of both, but you can use all one or the other)
Salt
1 red bell pepper, seeds and stem removed and diced
3-4 cloves garlic, peeled and minced
About 1/4 cup diced scallions, white and light green parts only
1/2 cup chopped fresh cilantro
about 1/4 cup canola or vegetable oil
Peel the yucca and/or sweet potato and cut it into 2-3 inch chunks. Add them to a saucepan and add enough water to cover the vegetables completely. Sprinkle in enough salt to make the water taste salty and set the pan over high heat. When the water begins to boil, lower the heat and simmer until the vegetables are very tender.
Drain the vegetables in a colander placed inside the sink and rinse briefly with cold tap water just to cool them down a bit. Dump them into a mixing bowl or the bowl of an electric mixer.
Mash the vegetables with a spoon, a potato masher, your hands, or do what I did and mash them with your electric stand mixer fitted with the paddle attachment. Add the diced red pepper, garlic, scallions, and 1/4 cup of the cilantro and mix until everything is blended together. Taste the mixture and add more salt if you like.
Add a couple tablespoons of oil to a large 12-inch non-stick skillet (add more oil if you’re not using a non-stick pan) and set the pan over medium-high heat. When the oil is hot and shimmering, add a few yucca cakes. The mixture for these cakes is very wet and sticky so rather than trying to shape them, I added about 1/2 cup directly to a flat spatula, then used a rubber spatula to help slide it from the flat spatula into the hot oil. After these blobs are in the pan, gently press the cakes into thick discs with the back of the flat spatula. You should be able to fit 4 yucca cakes in the skillet at one time.
Cook until the bottom of the cakes are a rich golden brown then use the spatula to flip them over and cook until they are brown on the other side. Pay attention to the heat - if they are browning very quickly and seem to be in danger of burning, lower the heat. It is important to cook them until they are brown and crispy on the outside. The combination of a crispy exterior and creamy interior is really delicious.
Transfer the cooked yucca cakes to a paper towel lined plate, cover with foil to keep warm, and continue to cook the rest of the yucca cakes.
In Costa Rica, you’ll see these served plain or with a variety of toppings. We like to eat them with diced avocado and cherry tomatoes, a dollop of sour cream or vegan sour cream, a drizzle of Aleppo pepper oil with garlic, and the remaining chopped cilantro.
If you shape them into cakes that are 3 or 4 inches in diameter, this recipe will make 10 cakes. For us, 3 cakes = one generous serving and we ate them with some leftover beans and rice.

The Casado Plate
The traditional Costa Rican lunch is called Casado and you will find it everywhere across the entire country. It comes in many variations but is always built around rice and beans. Casado means “married” and I loved learning this because the meal really is a marriage of traditional Costa Rican flavors.
The components of a typical casado plate include: Gallo pinto (beans and rice), fried plantains, tortillas, vegetables such as corn, avocado, cilantro, greens and tomatoes. Additional protein is often added to casado plates in the form of eggs, fish or ceviche, beef, or chicken.
While we were in La Fortuna we went on a guided white water rafting trip. After rafting, we were taken to a local restaurant for casado where we had the choice of fish, beef, chicken, or vegetarian. Both Steve and I opted for the vegetarian option and it was so delicious I’ve tried to recreate it here.
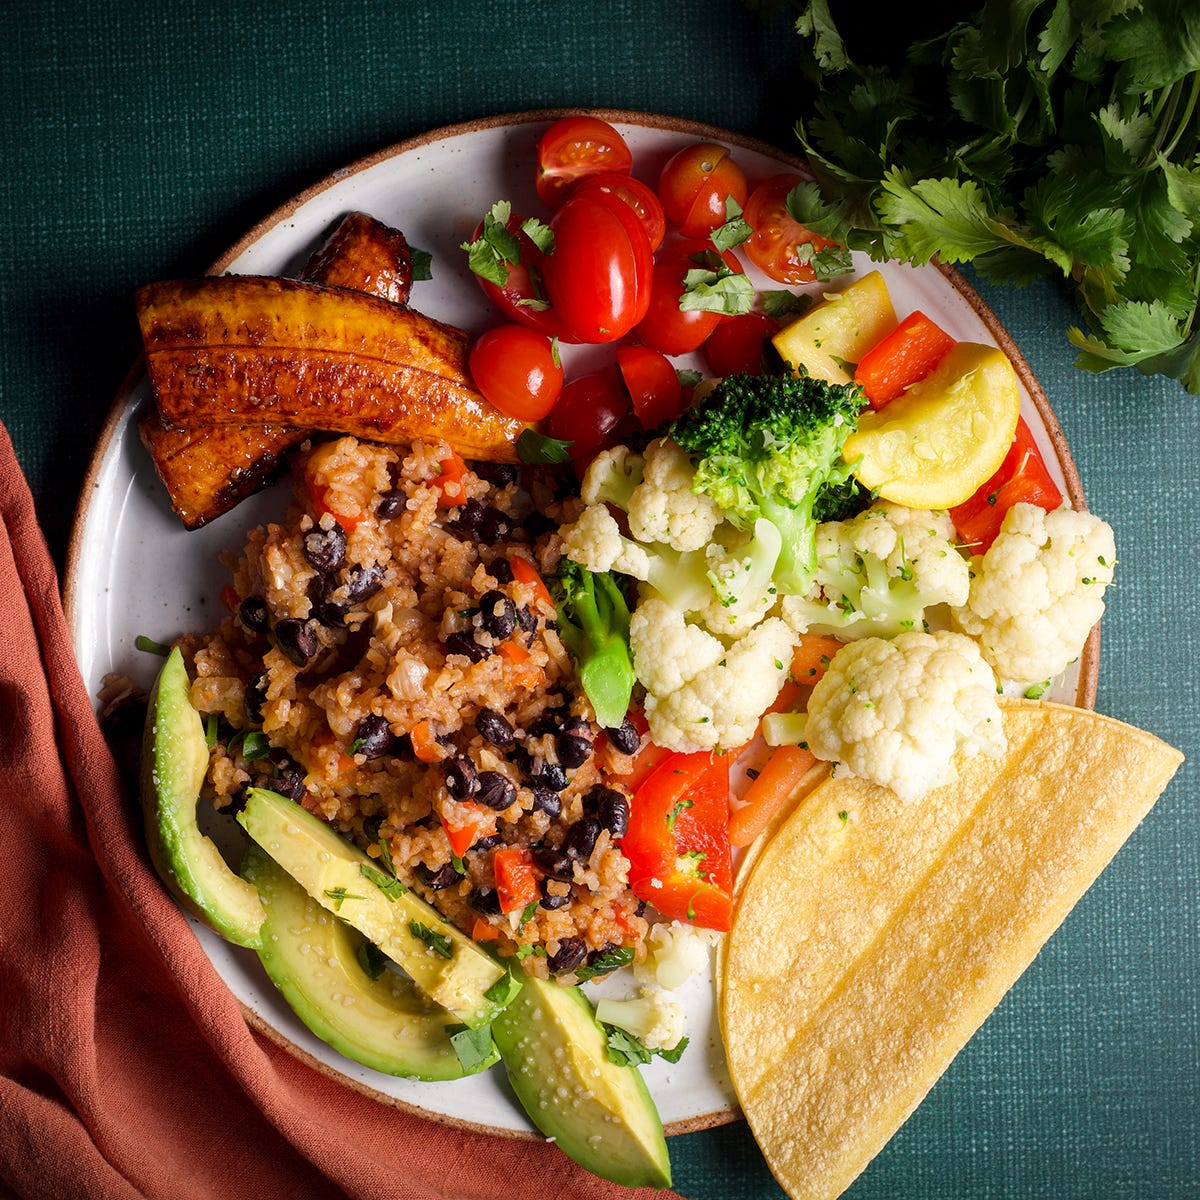
Ingredients
Gallo pinto (beans and rice) - use the recipe above
Fried plantains, with or without sugar - use the recipe above (the plantains we had at the restaurant included sugar and they made a delicious counterpoint to the rest of the savory food on the plate)
Corn tortillas - store bought or use the recipe above
Diced avocado and cherry tomatoes
Fresh cilantro
Salt
Mixed vegetables - I used red bell pepper, carrots, cauliflower, and broccoli
A pat or two of melted butter
Hot sauce (optional)
Use the recipes above to prepare the beans and rice, fried plantains, and corn tortillas.
Sprinkle the diced avocado and cherry tomatoes with salt and top with chopped fresh cilantro.
Cut the vegetables into pieces that are roughly the same size. Add enough water to a saucepan to contain the vegetables and then add enough salt to make the water taste salty. It’s very important to add enough salt to the water because it seasons the veggies while they cook. Bring the water to a full boil then add the vegetables all at once. Cook just until they are crisp tender. Don’t overcook. The goal is to cook the veggies just until they are tender but still crisp.
Drain the vegetables in a colander in the sink then add them to a bowl along with some melted butter. Toss the veggies around in the butter and taste for salt.
To serve: Add a generous serving of beans and rice to plates followed by a tortilla or two, a couple of fried plantains, some of the avocado and tomato salad and a large serving of mixed vegetables.
When we ate this in Costa Rica it did not come with hot sauce, but at home we usually add some.
Ceviche 2 ways
Before getting on a sail boat off the Pacific Coast, one of the deck hands mentioned that he was also a personal chef. I asked him what his specialty was and he answered, “ceviche”. This was not a surprise because ceviche on the menu at nearly every restaurant we ate at during our time there.
At a seafood restaurant in La Fortuna, we ordered a version similar to the recipe for Ceviche Costariqueno below. It’s a fresh, simple recipe that can be thrown together in just a few minutes and, of course, requires no cooking making it the perfect summer recipe. Although, I see no reason to restrict it to the summer months.
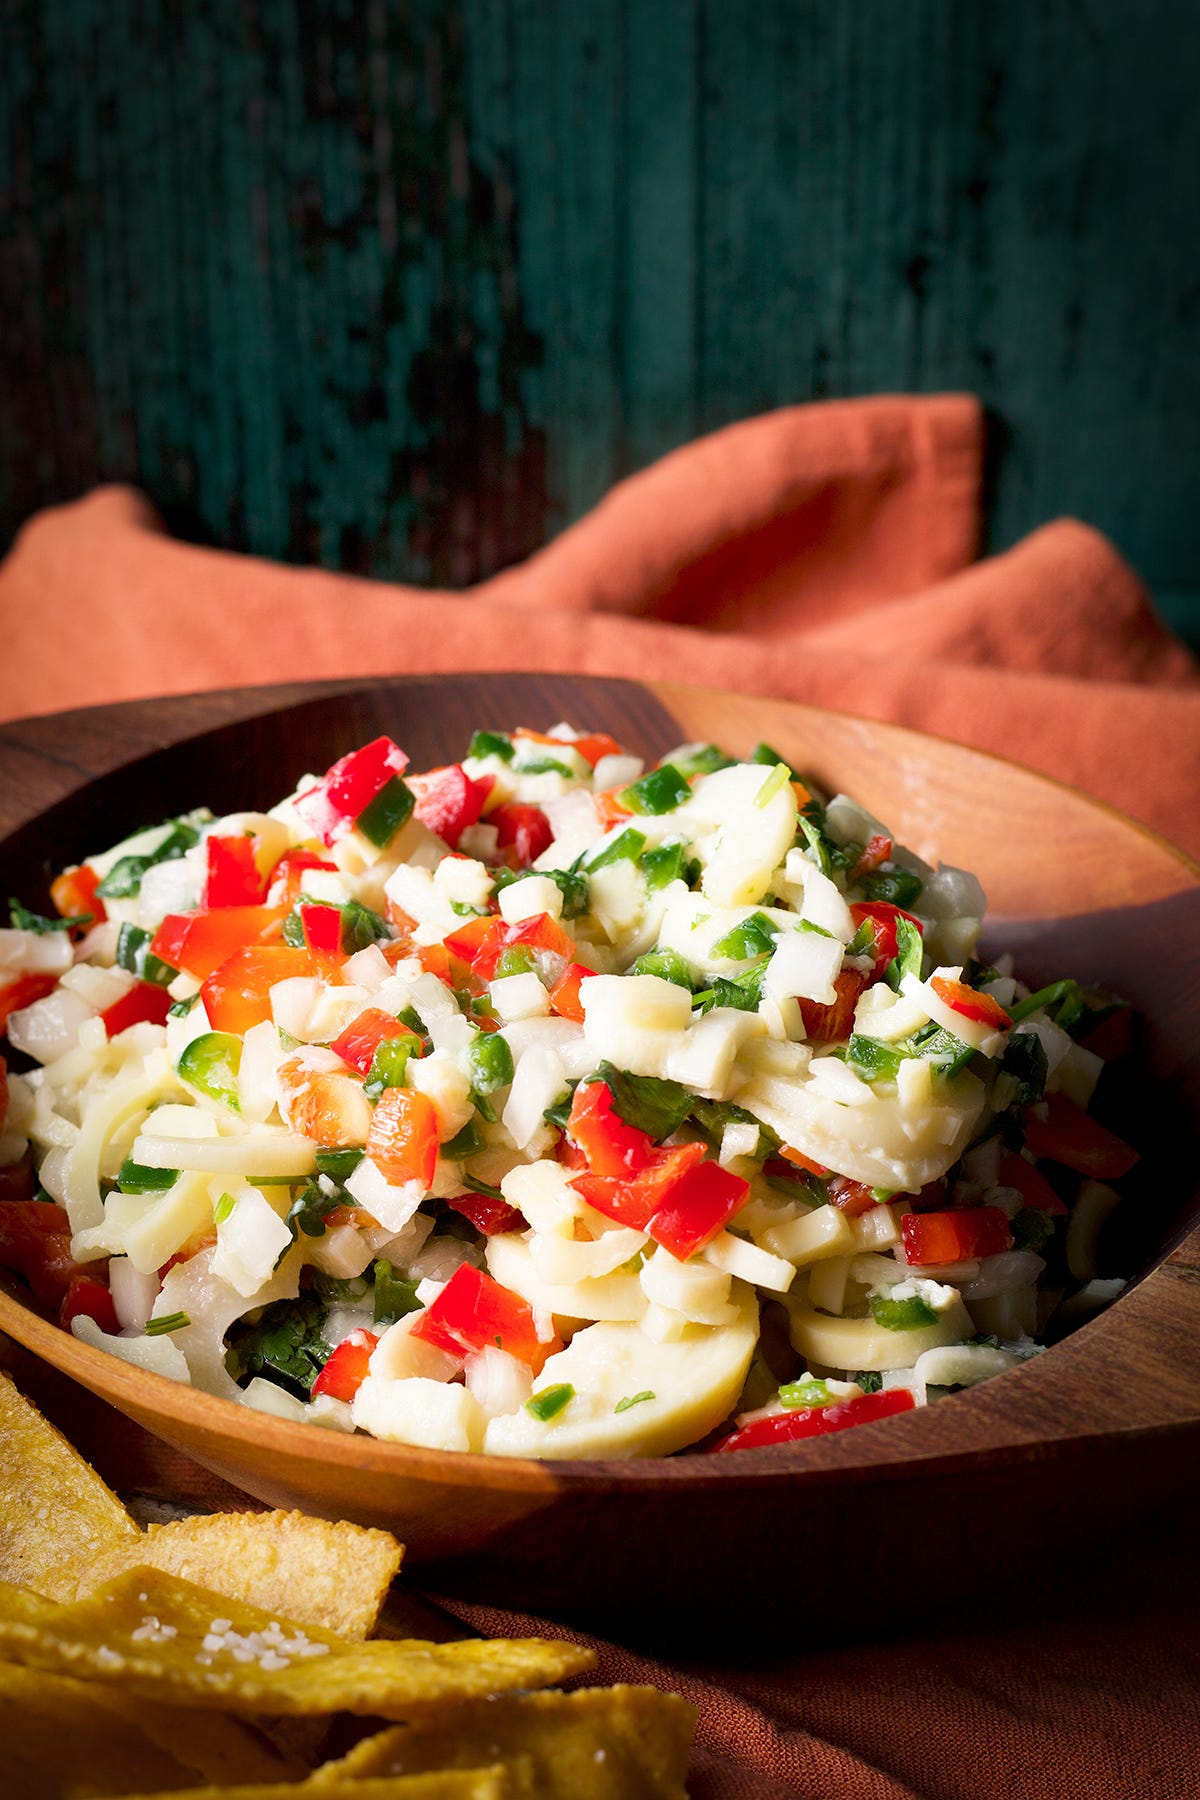
I was also drawn to the recipe for hearts of palm ceviche in The Blue Zones Cookbook, which includes an entire chapter of recipes from the Nicoya region of Costa Rica. Hearts of palm is not a vegetable I’ve used often, and making this vegan ceviche has peaked my interest in how I might use it more often.
Heats of palm are, as the name suggests, harvested from the core of palm trees. You’ll find fresh hearts of palm in most Costa Rican markets. It’s rare to find them fresh in the US, but thankfully, canned hearts of palm are sold in most grocery stores.
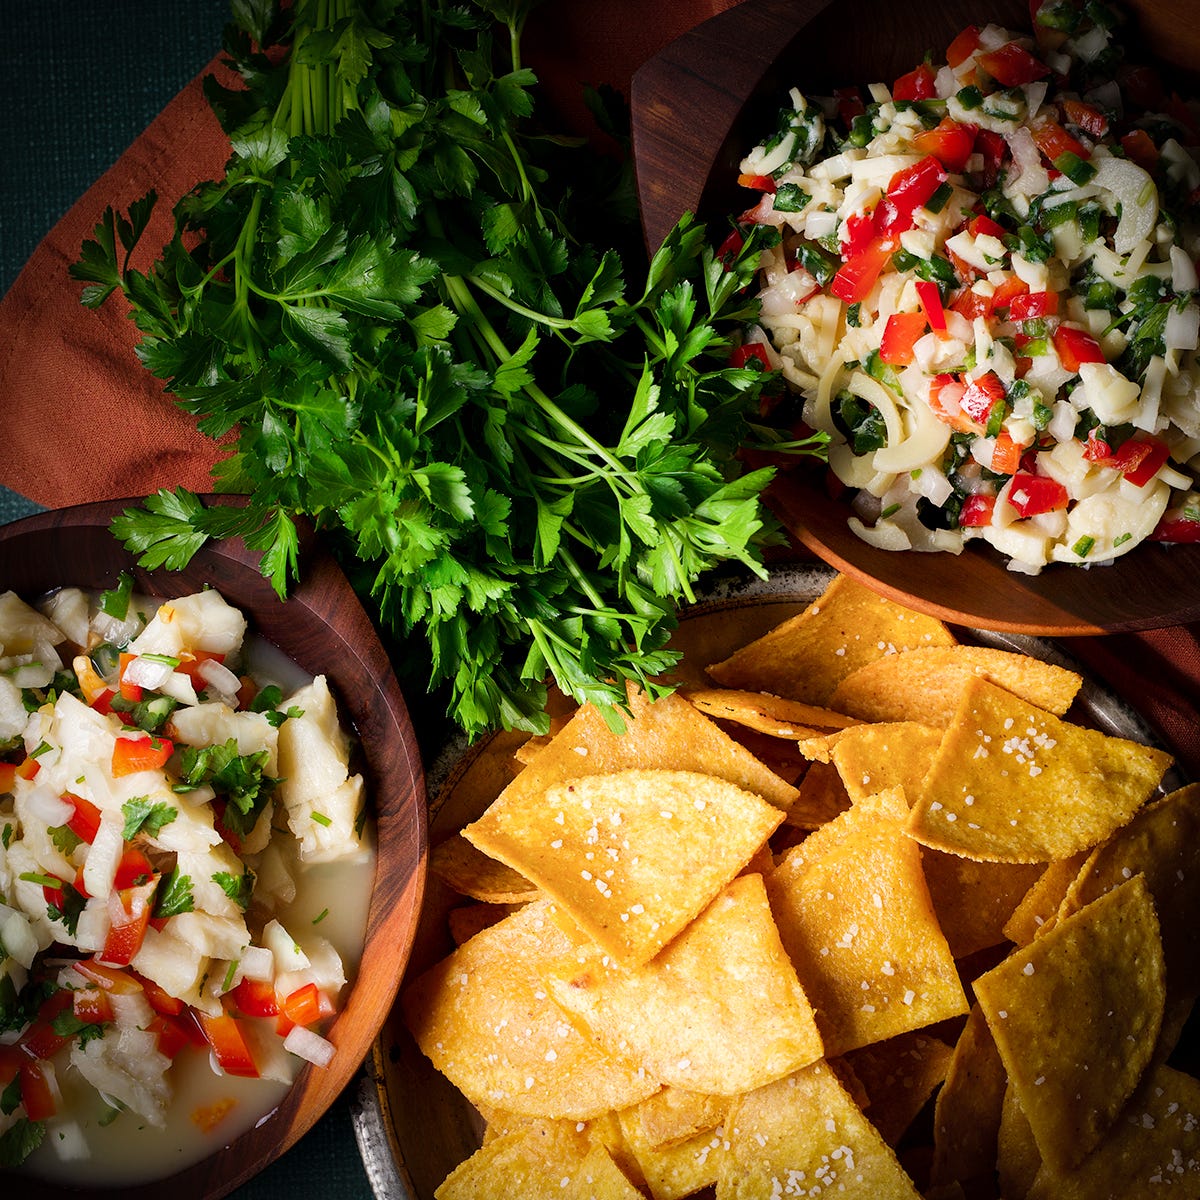
Hearts of palm ceviche
(Adapted from The Blue Zones Kitchen Cookbook)
1 cup hearts of palm, sliced into very small round pieces (I used canned)
1 small sweet onion, peeled and minced
1 red bell pepper, seeds and stem removed and minced
1 jalapeño, seeds and stem removed and minced
2 tablespoons fresh cilantro, chopped (more to taste)
2-4 tablespoons fresh lime juice
Salt and pepper to taste
Add the sliced hearts of palm, minced onion, red bell pepper, jalapeño, and cilantro to a bowl and stir to mix. Pour in 2 tablespoons of lime juice and sprinkle with a small amount of salt and pepper. Taste and add more lime juice, salt, and/or pepper if desired.
Serve immediately or store in the refrigerator for up to 12 hours.
Ceviche Costariqueno
(Adapted from The Amazing Costa Rican Cookbook)
1 pound white fish fillets, cut into 1/2-inch size pieces
1/2 cup fresh lime juice
1/4 cup orange juice
1/2 cup diced yellow onion
1 red bell pepper, diced
1/4 cup chopped fresh cilantro
Salt and pepper
Add the fish, lime juice, orange juice, onion, bell pepper, and cilantro to a bowl and stir gently to mix. Sprinkle in a little bit of salt and pepper, cover, and refrigerate for at least 30 minutes, or until the fish is opaque and firm. Taste and add more salt and pepper if desired.
Ceviche can be stored in the refrigerator for up to 12 hours. (Ceviche is safe to eat for up to 2 days after preparing, but after 12 hours the acid and salt start to break down the proteins in the fish changing its texture and making it a bit mushy.)
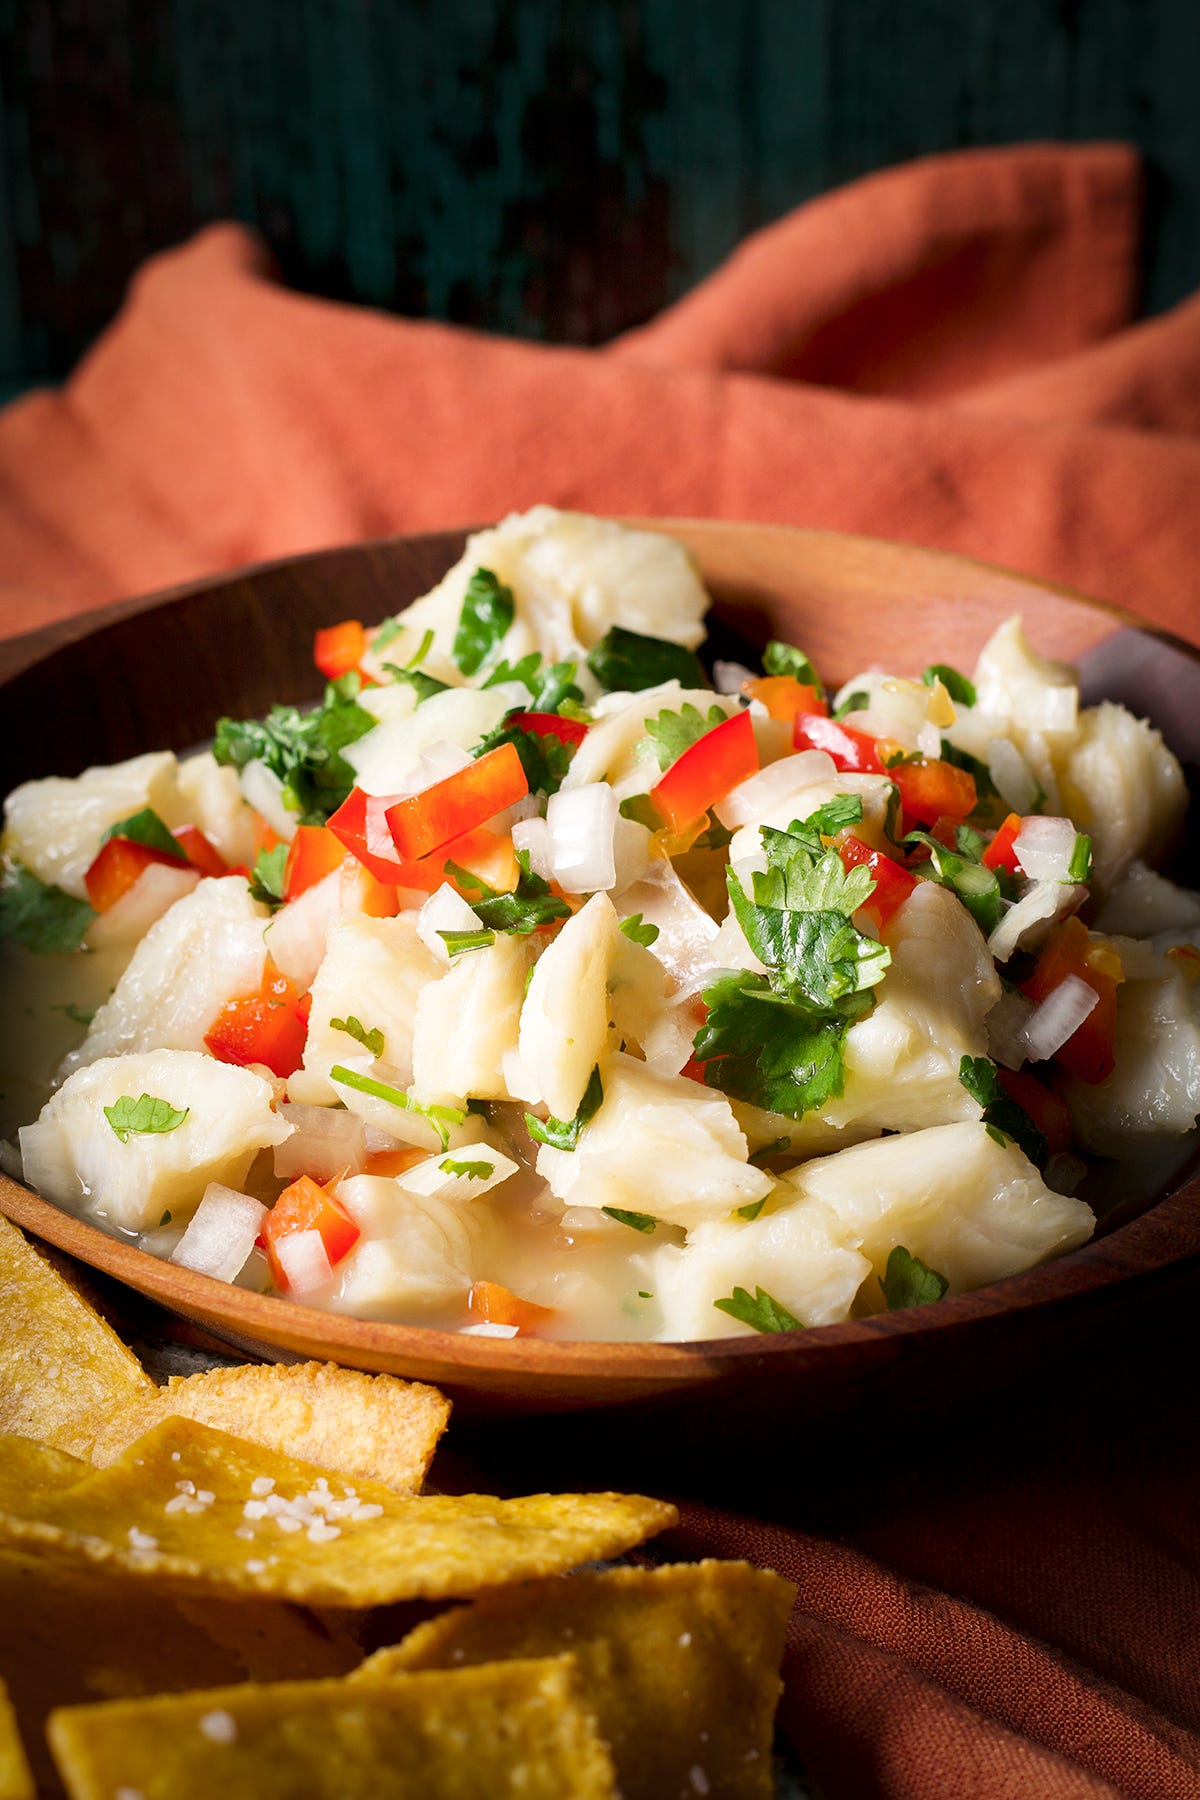
Serve ceviche with tortilla chips. If you’d like to make your how, here’s how to make homemade tortilla chips, which is what you see in the photos above.
Lentil Burgers
This recipe is inspired by a lentil burger I had at a restaurant called The Green Spoon in La Fortuna. The restaurant was one of the many within walking distance of our our rental home and we chose it because from the sidewalk it seemed to exude fresh and healthy and that’s what we were after that night. Also, I could see people on their outdoor covered patio drinking sangria in glasses so packed with fresh fruit it was almost like a fruit salad, so who was I to try and resist?
I ordered a lentil burger and decided after the first bite that I was going to figure out how to make them at home. This recipe is the result.
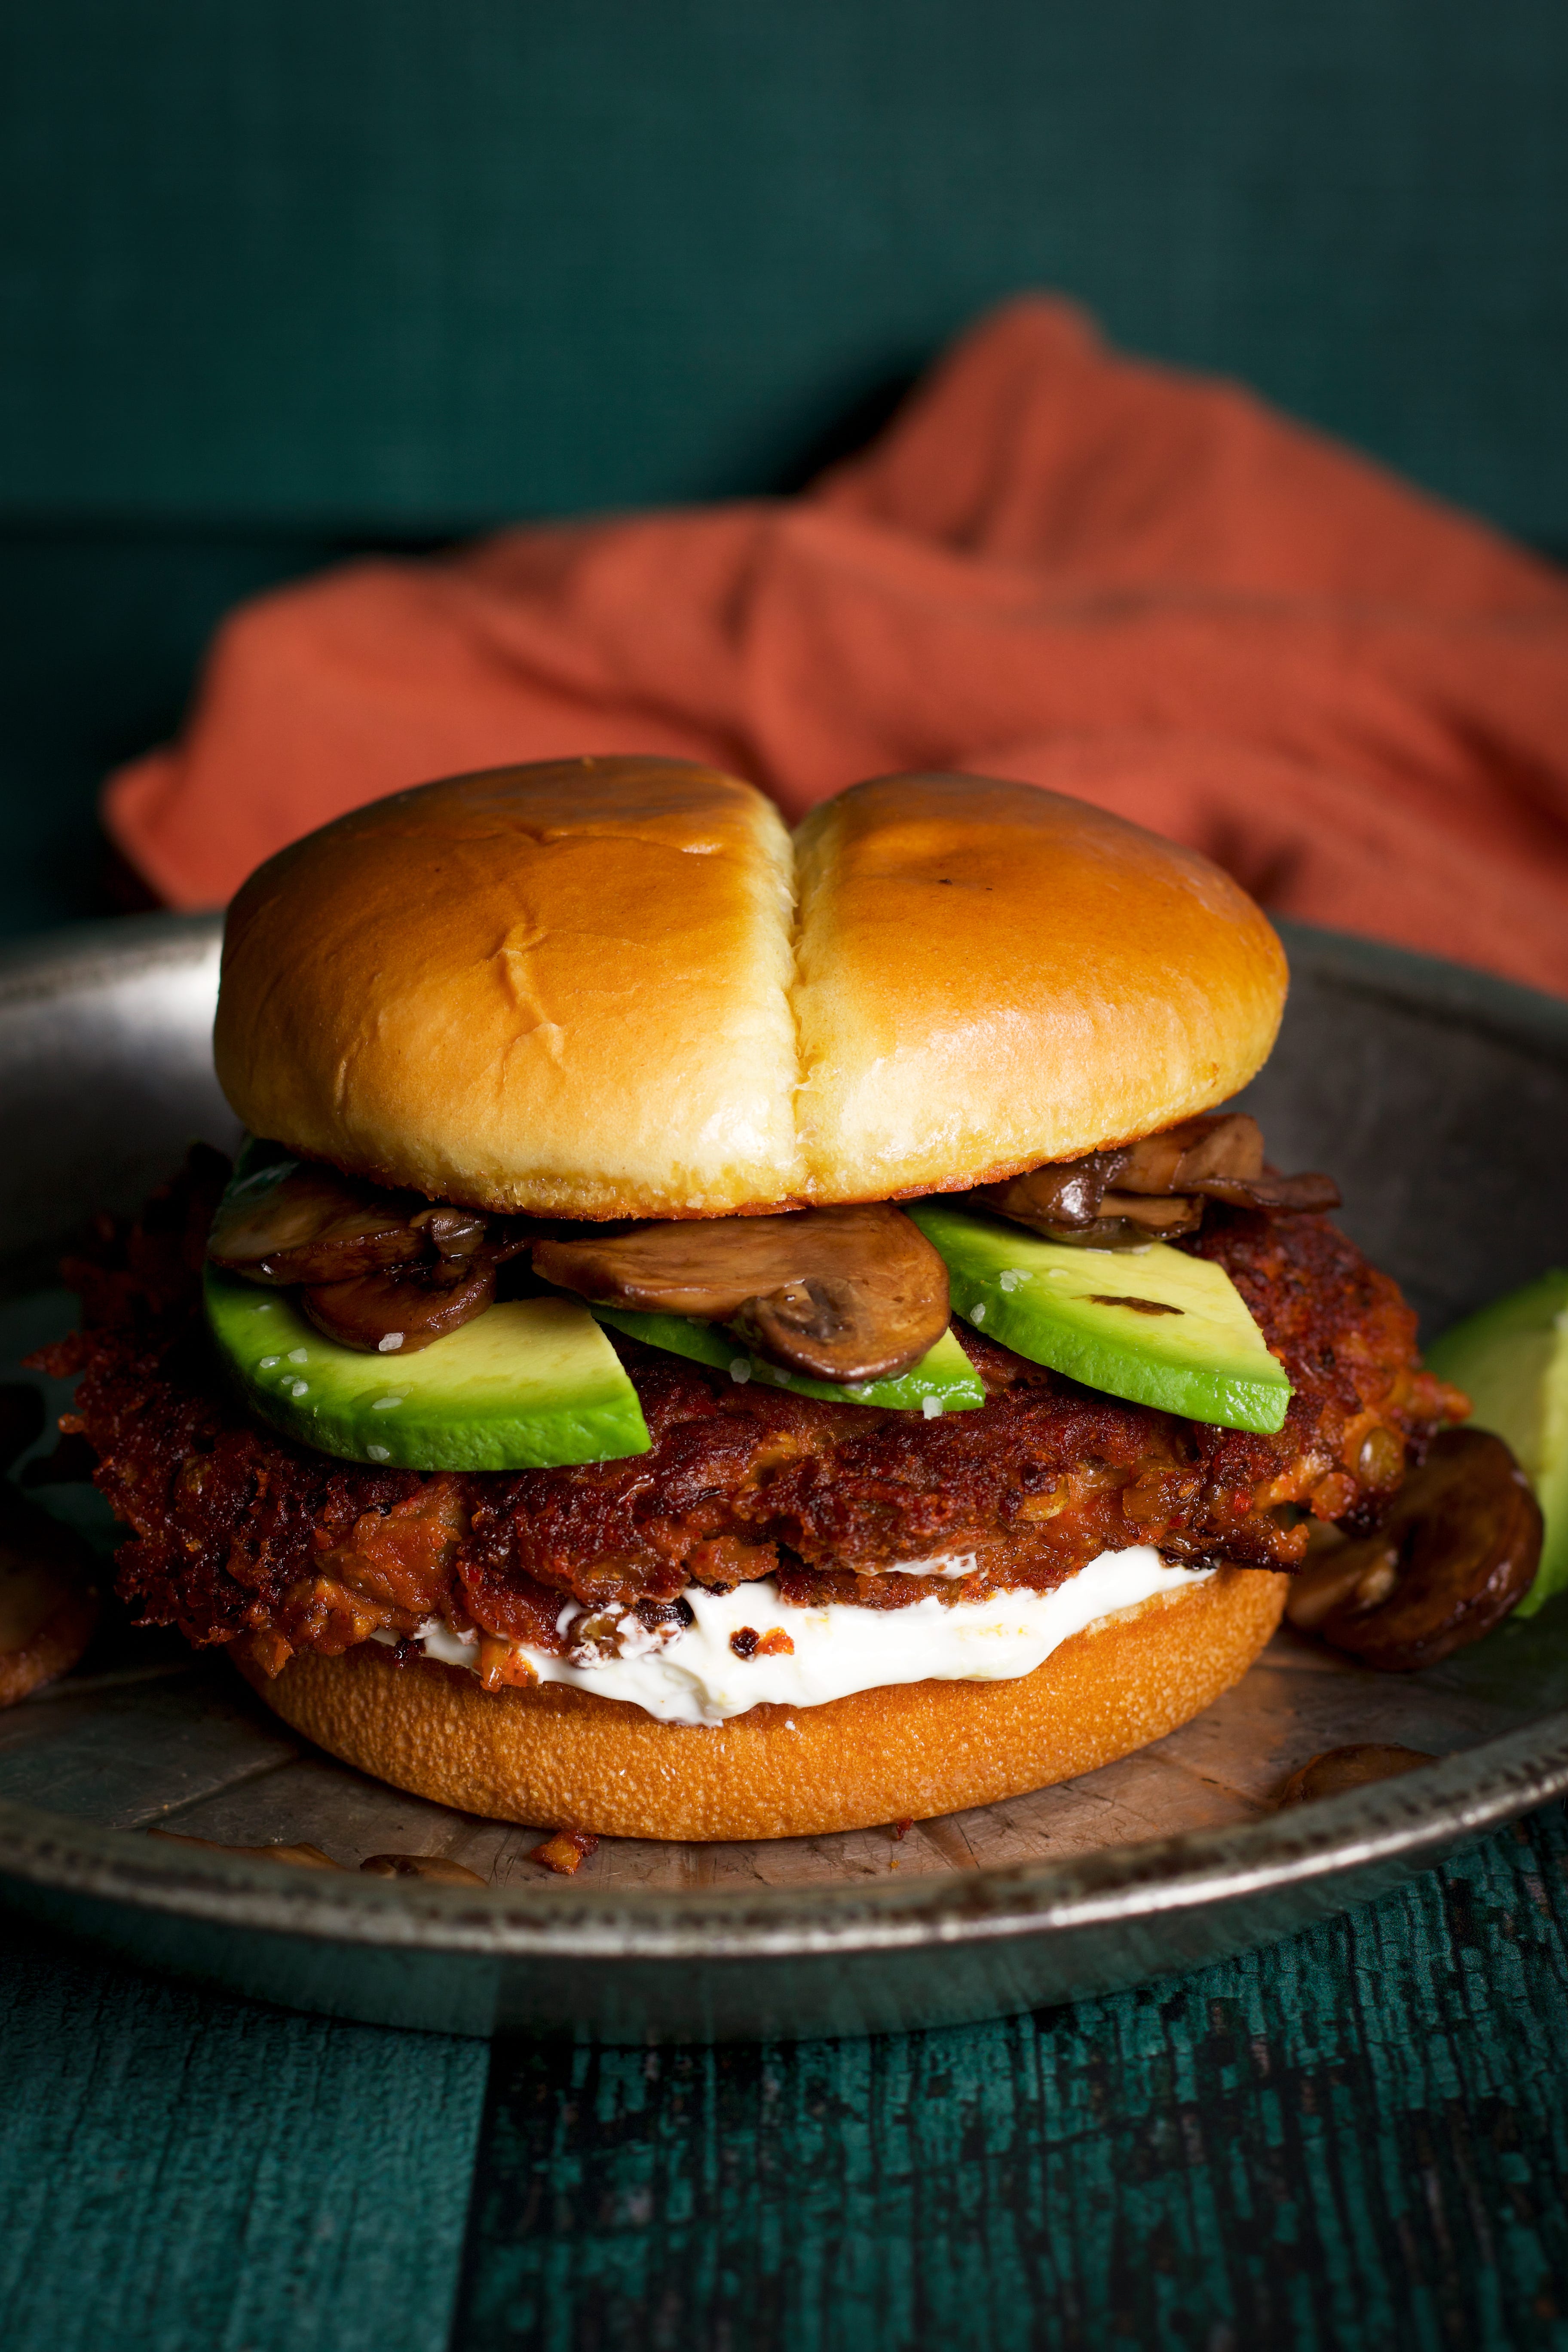
Makes 4 patties. These are sloppy sandwiches best served with a fork.
Ingredients:
1/2 cup whole-milk greek yogurt or labneh cheese
The zest and juice from 1 large lemon
2 -3 cloves of garlic, minced (more or less to taste)
1/4 cup extra virgin olive oil, divided
3 ounces of mushrooms (any variety), sliced
About 1/3 cup chopped shallots or yellow onion
About 1/4 cup fresh parsley
1 generous tablespoon tomato paste
1 generous tablespoon white miso (or just use 2 tablespoons of tomato paste)
1 teaspoon ground cumin
1 teaspoon smoked paprika
2 teaspoons Aleppo pepper (or any kind of chili powder - use more or less depending on how spicy it is)
1 1/2 cups cooked green or brown lentils (well drained)
1/4 cup chopped walnuts
Salt
1/4 cup bread crumbs
For serving: Toasted buns, sautéed mushrooms, sliced and salted avocado
Combine the yogurt or labneh, lemon zest, lemon juice, and minced garlic in a small bowl. Season with salt; set aside.
Add 2 tablespoons of oil to a skillet and set it over medium heat. Add the sliced mushrooms and chopped shallot to the skillet and cook, stirring frequently, until the vegetables have released most of their moisture and the skillet looks dry. Lower the heat and add the parsley, miso, tomato paste, cumin, paprika, and Aleppo pepper, and cook, stirring for 2 minutes longer. Remove from the heat.
Add the cooked lentils, walnuts, the mushroom mixture, and 3/4 tsp salt to a food processor. Process until everything is well combined but still has some texture. Scrape the mixture into a bowl and add the bread crumbs. Stir until everything is well combined. Taste and add more salt if desired. If the mixture isn’t holding together, sprinkle in some additional bread crumbs.
Form into four patties.
Heat 2 tablespoons of oil in a large nonstick skillet (nonstick is essential since these will definitely stick to a regular skillet) over medium. Cook until the patties are deeply browned and very crisp on bottom side, about 3 - 5 minutes. Carefully turn and repeat on second side, adding more oil as needed to maintain a light coating around patties.
I like to toast the buns for these, which I usually do in the skillet before I cook the patties, after spreading the buns with butter. To serve, spread a thick layer of the yogurt mixture on the buns then top with burgers. Top the patties with sautéed mushrooms and slices of salted avocado.
Do Ahead: The patties can be made 4 days ahead. Tightly wrap in plastic and keep in the refrigerator.
El Coquito
While in La Fortuna, we ate dinner at Snapper’s House, a seafood restaurant that had been recommended by the guide from the white water rafting trip we had been on earlier that day. We enjoyed everything we ate there but one of my favorite parts about that meal was the drink I ordered.
This recipe is my attempt to recreate the tart, sweet, coconut drink and now I want to make this every day.
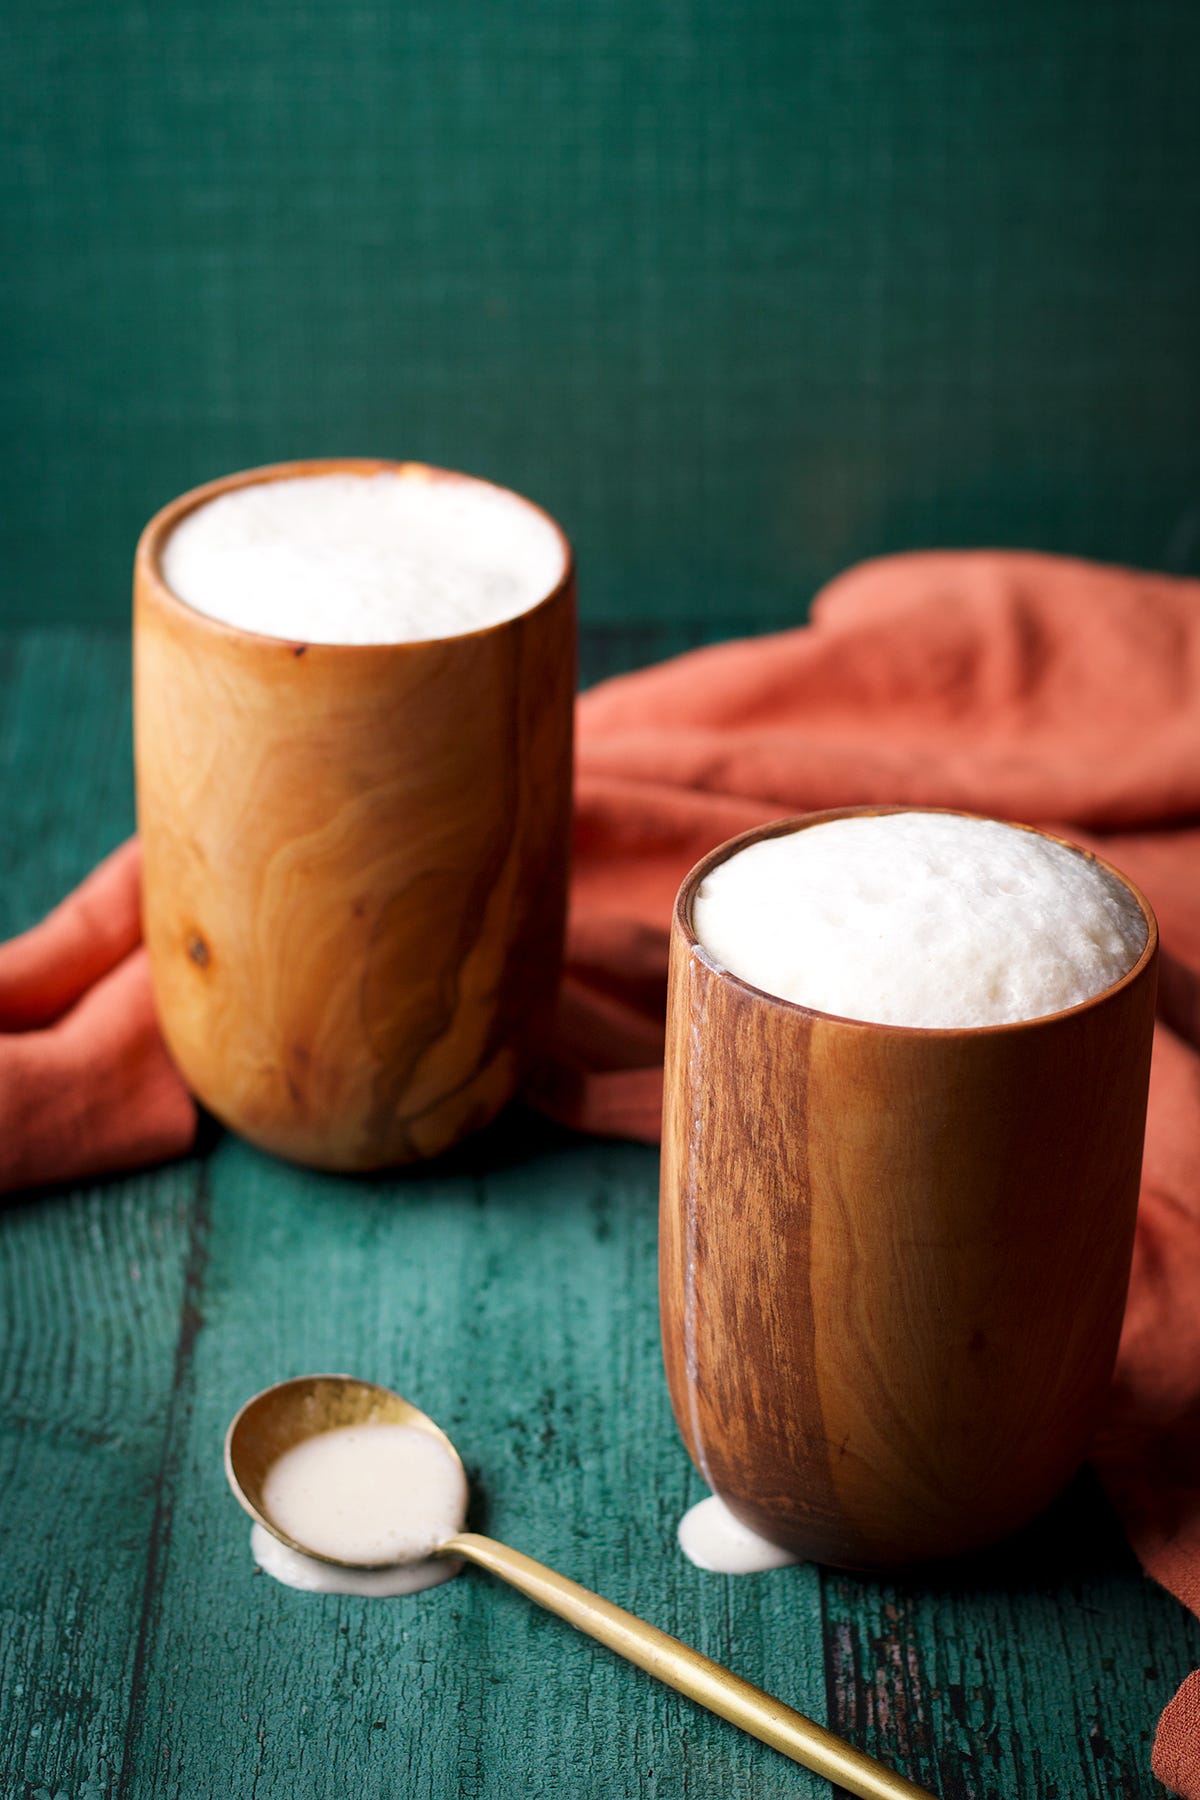
Makes 4 servings
2 cups of whatever ratio you want of coconut cream to coconut milk and/or coconut water
1/3 cup lime juice
1 large or two small bananas, preferably frozen
Sweetener to taste - I used about 1/4 cup of chopped dates plus a couple tablespoons of stevia. Other options: granulated sugar, coconut sugar, honey, agave, maple syrup
Ice
Sparkling water/ seltzer water/ club soda
Add the coconut cream, coconut milk, lime juice, bananas, and sweetener to a blender and blend until creamy. Taste and add more sweetener if desired then add a few ice cubes and blend until icy and frothy. Pour into cups, leaving space at the top for about 1/2 cup of seltzer water.
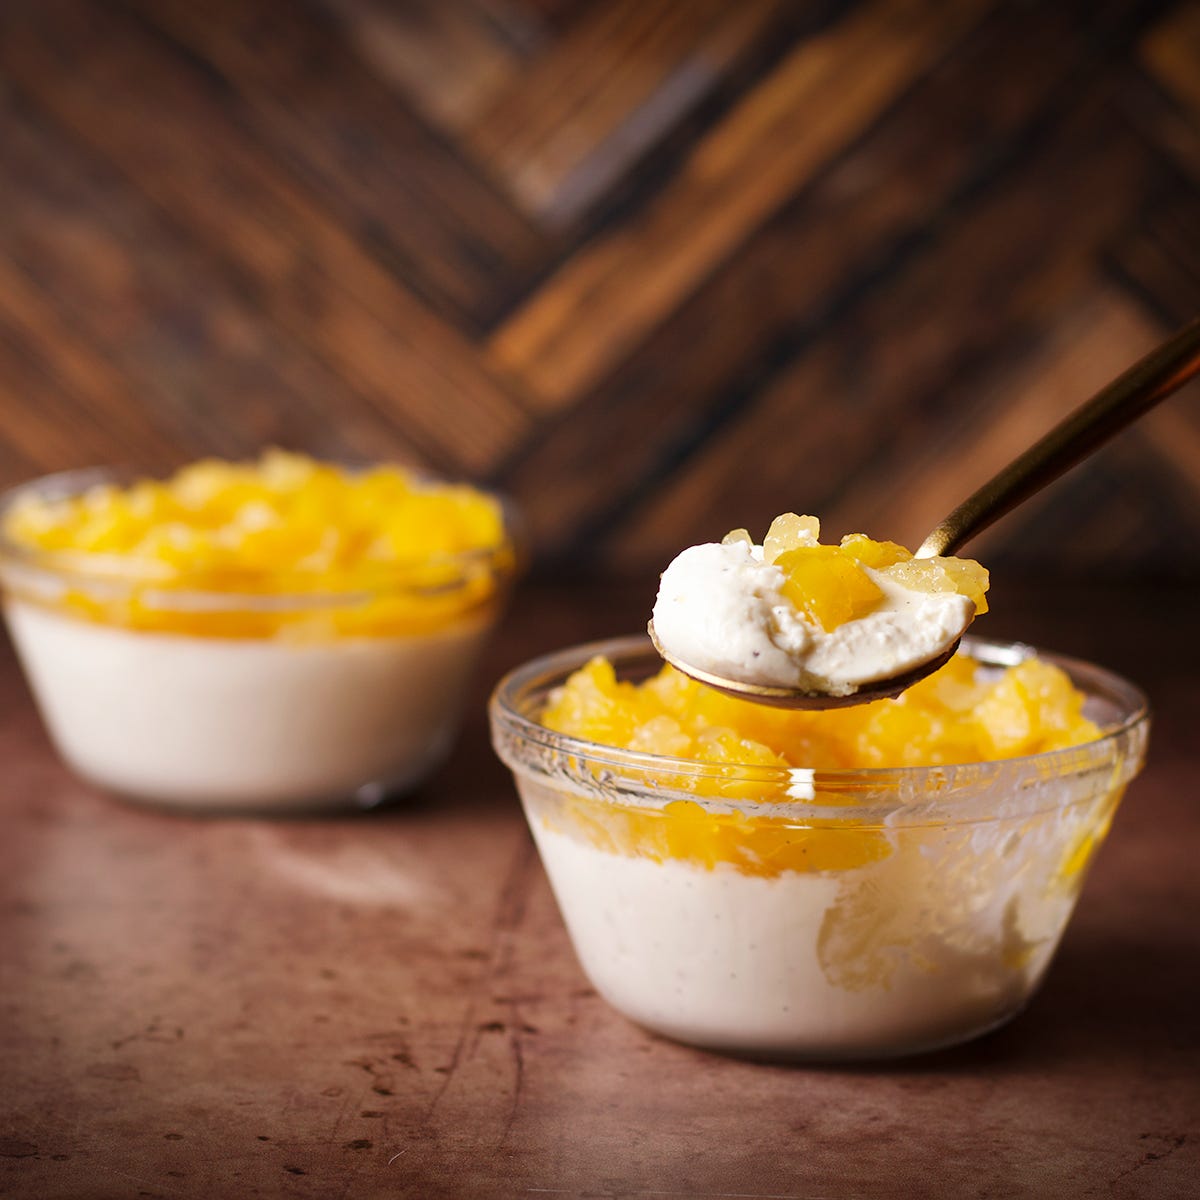
Panna cotta with mango or passion fruit
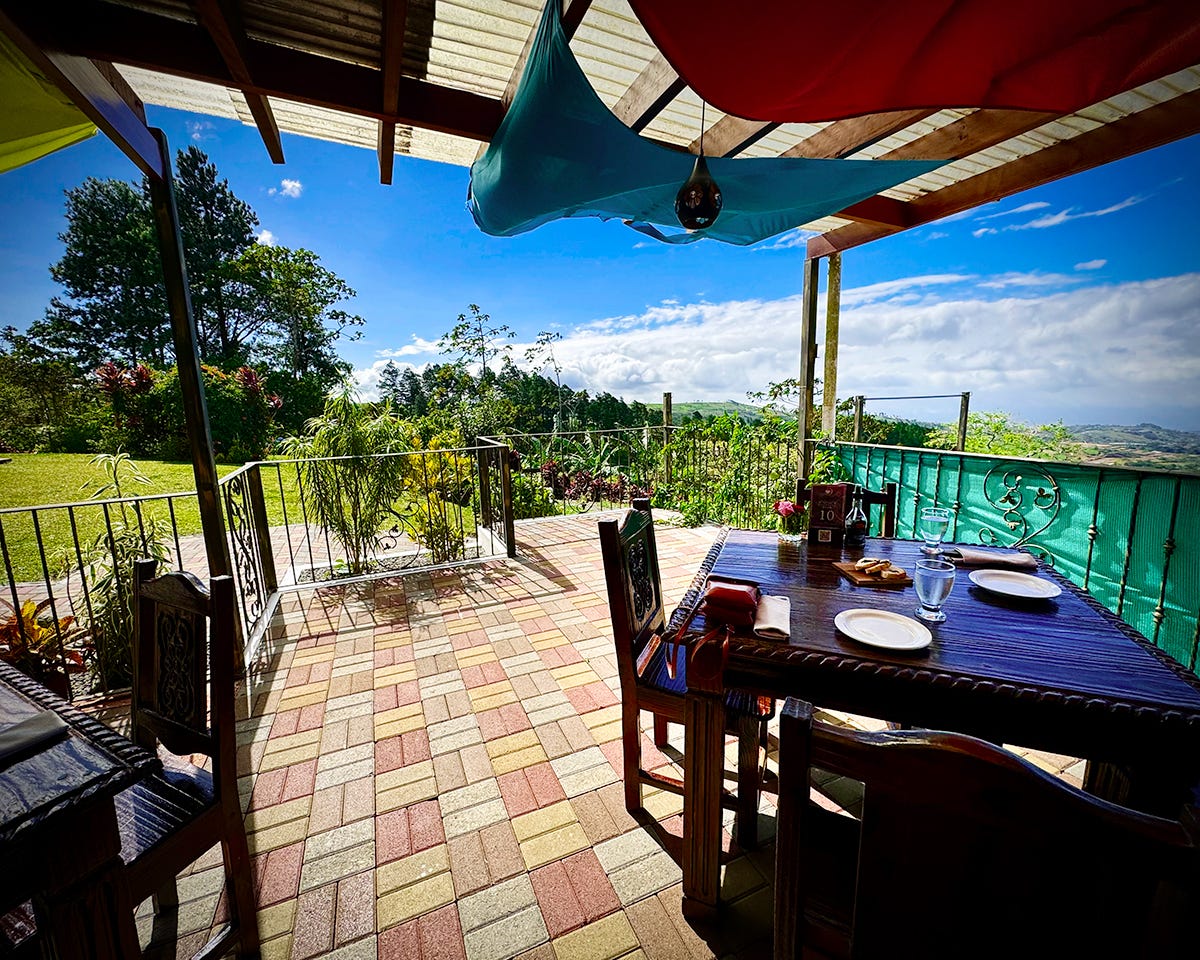
We spent two nights in Ciudad Quesada, the largest city in the Alajuela Provence, about 100 kilometers from San Jose in the fertile farmlands of the central mountains. We arrived around 3 in the afternoon having left San Jose late that morning and were starving. I quickly looked up restaurants on my phone and chose one of the first ones I saw.
The restaurant was Las Hortensias and it was a fortunate choice. Las Hortensias is a family run restaurant and small boutique hotel that sits just outside the city on a lush, hillside where they grow much of the food they serve in the restaurant. Since it was the middle of the afternoon, we had the place to ourselves and the view was spectacular.
After salads from greens cut straight from the garden, I ordered the fired pork rib in tamarind sauce and it was fantastic. One of these days I’ll try to recreate it and share the recipe with you if I manage to get anywhere close to the meal we had that day. Until then, dessert will have to do.
This recipe is based on their passion fruit panna cotta which was light and creamy and covered in a tart passion fruit sauce. Sadly, I couldn’t find any passion fruit on the day I was preparing this for the photo, but mango made a perfectly acceptable substitute. You can use whichever fruit you like or have access to.
For such a delicious, elegant dessert, panna cotta is incredibly easy to make. The hands-on time is minimal and panna cotta will keep well in the refrigerator for at least 3 days.

For the vanilla bean panna cotta:
1 vanilla bean, split lengthwise, seeds scraped (you can also use 2 teaspoons of vanilla extract or vanilla bean paste)
2 cups heavy cream or coconut cream
1/4 cup honey
1/8 teaspoon salt
1 1/4 teaspoon unflavored powdered gelatin (for a vegan substitute, use 2 teaspoons agar-agar powder)
1 tablespoon water
If using a vanilla bean, cut it in half lengthwise and use the sharp tip of a knife to scrape the seeds from the inside of the bean. (If using vanilla extract or vanilla bean paste, you’ll add it later.)
Add the heavy cream or coconut milk to a medium size saucepan and add the vanilla bean seeds and both halves of the vanilla bean. Stir in the honey and salt and set it over medium heat. Bring the mixture to a simmer then remove the pan from the heat, cover, and let it rest for 15 minutes to infuse the cream with vanilla. (There is no need to let it rest if using vanilla extract or vanilla bean paste.)
Meanwhile, add the gelatin to a small bowl and add 1 tablespoon of water. Stir to saturate the gelatin, then set aside.
Uncover the cream mixture and bring back to a gentle simmer over moderately high heat. Remove from the heat, add the gelatin, and stir until dissolved. Remove the vanilla bean, reserving it for the fruit topping. (If using vanilla extract or vanilla bean paste, add it now.)
Pour the panna cotta mixture into four 4-ounce ramekins, cover and refrigerate until the panna cotta is set, about 3 hours.
For the mango topping:
1/4 teaspoon powdered, unflavored gelatin (for a vegan substitute, use 2 teaspoons agar-agar powder)
2 teaspoons water
about 1 cup diced mango (or berries)
1/4 cup honey
A pinch of salt
Add the gelatin to a small bowl and add 2 teaspoons of water. Stir to saturate the gelatin then set aside.
Add the mango, honey, and reserved vanilla bean to a small saucepan and set it over medium heat. Bring the mixture to a simmer then cover the pan and lower the heat to a gentle simmer. Cook, stirring frequently, until the fruit is very soft and breaking down.
Remove the saucepan from the heat, remove the vanilla bean and add the gelatin. Stir until completely dissolved then scrape the mixture into a bowl and let it cool to room temperature. Distribute the sauce over the chilled panna cottas and refrigerate for at least an hour before serving and up to 3 days.
If you have some passion fruit, here’s how to make a passion fruit topping for panna cotta:
1/2 cup water
1/2 teaspoon powdered, unflavored gelatin (for a vegan substitute, use 2 teaspoons agar-agar powder)
1/4 cup granulated sugar
1/2 cup strained passionfruit pulp with seeds
Add the water to a small saucepan and sprinkle the gelatin over the top. Let the gelatin soften for a couple of minutes then place the pan over low heat and stir until the gelatin has completely dissolved. (Don’t bring it to a simmer.)
Keeping the pan over low heat, add the sugar and stir until the sugar has dissolved. Remove from the heat and stir in the passionfruit pulp.
Allow the sauce to cool to room temperature then over the chilled panna cottas and refrigerate for at least an hour before serving and up to 3 days.
Thanks for reading! If you are enjoying this newsletter, please tell your friends! Referrals earn free issues!
And, if you make something from this issue, have questions or anything you’d like to share, add a comment below. I ❤️ to hear from you.